
Table of Contents
Brake Check on a Mercedes-Benz E-Class W212: Solving Brake Vibrations
A regular brake check is essential for maintaining your Mercedes-Benz’s safety and performance. In this case study, we’ll look at a Mercedes-Benz E-Class W212 that experienced vibrations while braking a common issue that often points to warped brake discs or worn-out pads.
This guide walks you through the diagnostic and repair process step by step, helping you understand the real cause of brake vibrations and how to restore optimal braking performance.
For a complete overview of how ABS, ESP, and Brake Assist systems interact, visit our Mercedes Brake System Problems: ABS, ESP & Brake Assist Guide.
Symptoms: What the Driver Experienced
The owner reported the following symptoms:
- – Steering wheel vibrations when braking : a clear indicator of warped or unevenly worn brake discs.
- – Reduced braking efficiency : longer stopping distance than usual.
- – Slight squeaking noises : often caused by worn brake pads or glazing.
These observations suggested brake disc deformation and uneven pad wear, requiring a thorough brake system inspection.
Step-by-Step Brake Check & Repair
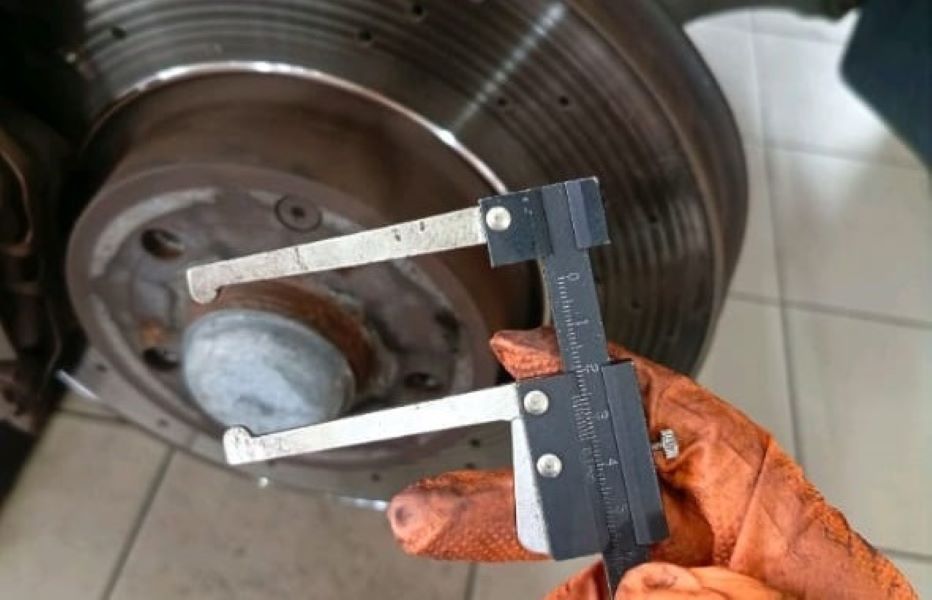
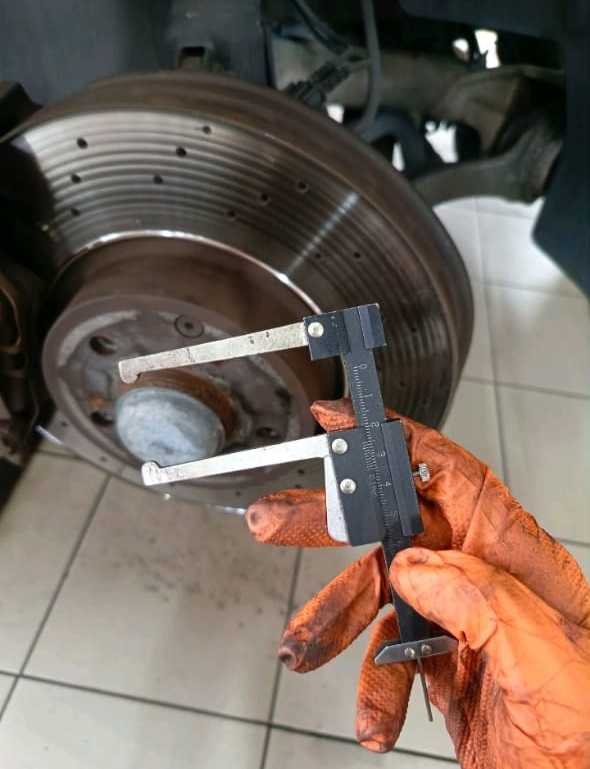
Step 1: Visual Brake Inspection
A full brake system check was performed before replacing any parts:
– Brake Discs (Rotors): Deep grooves and uneven wear revealed that they had reached the wear limit.
– Brake Pads: Thin and unevenly worn, confirming replacement was needed. (See related guide: Check Brake Pad Wear Alert: Fix It Fast)
– Brake Calipers: Inspected for sticking pistons or uneven clamping force.
– Brake Fluid: Level and color checked for contamination or leaks.
After confirming the issue, replacement was planned for both the discs and pads.
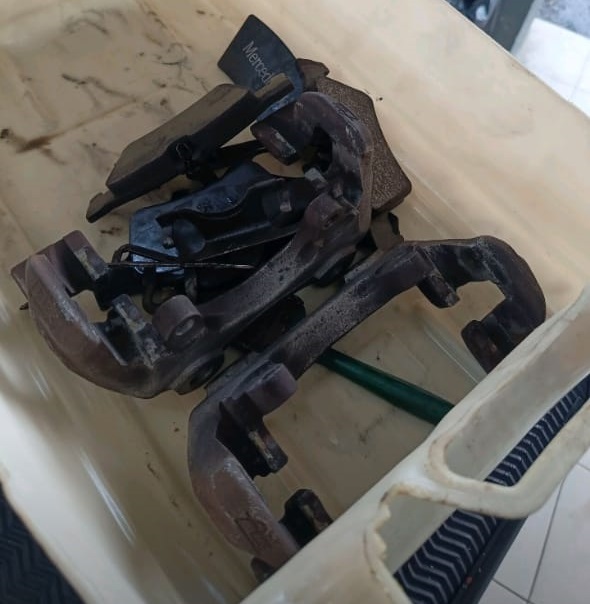
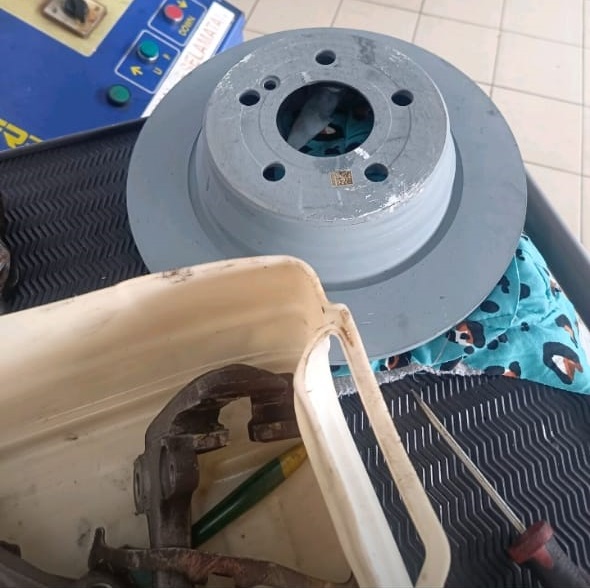
Step 2: Removing Worn Components
Removal procedure:
- 1. Loosen the wheel lug nuts before lifting the car.
- 2. Lift and secure the vehicle on jack stands.
- 3. Remove the wheel and unbolt the brake caliper, supporting it with a hook to avoid tension on the hose.
- 4. Remove the old brake pads and inspect their wear pattern.
- 5. Unbolt and remove the brake disc (use a rubber mallet if seized).
This step revealed visible hot spots and thickness variation classic signs of rotor warping.

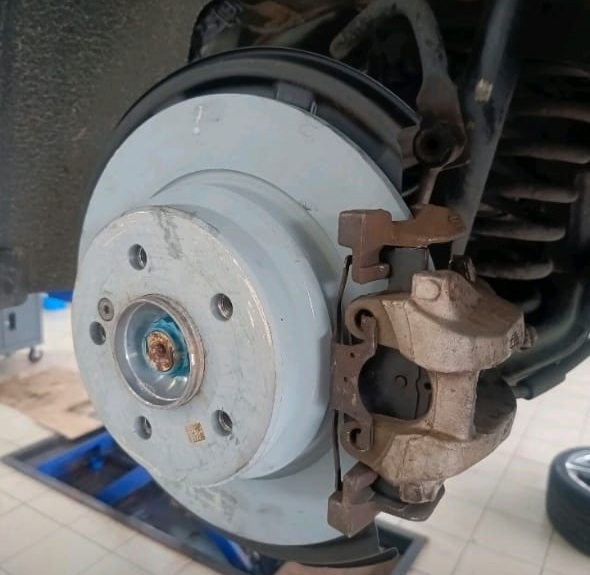
Step 3: Installing High-Quality Replacement Parts
To ensure long-term reliability:
- – New OEM brake discs were fitted to maintain factory-level performance.
- – New brake pads with the correct friction material were installed for smooth operation.
Installation steps:
- 1. Clean new discs with brake cleaner to remove protective oils.
- 2. Mount the disc on the hub and secure it firmly.
- 3. Fit new pads into the caliper bracket.
- 4. Reinstall and torque the caliper bolts to manufacturer specifications.
Step 4: Caliper & Brake Fluid Inspection
After mechanical installation, the hydraulic and caliper systems were checked:
- – Caliper Pistons: Verified for smooth movement and even pressure.
- – Brake Lines: Checked for cracks or leaks.
- – Brake Fluid: Topped up and tested. Contaminated fluid was replaced to maintain braking response.
Step 5: How to Check Brake Fluid Properly
- 1. Locate the Reservoir: Under the hood, near the driver’s side firewall.
- 2. Check Level: Fluid must be between MIN and MAX marks.
- 3. Inspect Condition:
- – Clear or light yellow → good.
- – Dark brown/black → contaminated, replace immediately.
- 4. Top Up: Use the correct DOT-rated brake fluid (usually DOT 4+ for Mercedes).
- 5. Check for Leaks: Low fluid may indicate leaks at calipers, hoses, or master cylinder.
Step 6: Road Test & Verification
After replacing discs and pads, a controlled test drive was performed:
- – At different speeds: No vibrations or steering shake.
- – During moderate and hard braking: Consistent stopping power.
- – Noise check: Silent and smooth braking confirmed successful repair.
When Should You Perform a Brake Check?
If you notice any of these signs in your Mercedes-Benz E-Class W212 (or similar models), schedule a brake inspection immediately:
| Symptom | Possible Cause |
|---|---|
| Vibrations while braking | Warped or uneven brake discs |
| Squeaking or grinding noises | Worn-out pads or glazed rotors |
| Reduced braking power | Air in lines or worn components |
| Spongy or soft pedal | Low or contaminated brake fluid |
Ignoring early signs can lead to costly damage and reduced safety.
Prevention Tips
- – Replace brake fluid every 2 years (DOT 4+ recommended).
- – Avoid hard braking on hot discs to prevent warping.
- – Inspect pads and discs every 15,000 km.
- – Use OEM-quality parts for consistent performance.
- – Clean ABS sensors and check for corrosion around calipers.
FAQs
Q1: What causes brake vibration on Mercedes-Benz vehicles?
Warped rotors, uneven pad wear, or seized calipers are the most common causes. Overheating or cheap aftermarket discs can worsen the issue.
Q2: Can I drive if my brakes vibrate?
It’s not recommended. Vibrations reduce braking efficiency and can damage suspension components.
Q3: How often should I perform a brake check?
Every 10,000–15,000 km or if any warning light, squeak, or vibration appears.
Conclusion
This case study shows how a simple brake check restored smooth braking in a Mercedes-Benz E-Class W212. By replacing worn discs and pads, inspecting calipers, and verifying fluid quality, the vehicle regained full braking performance.
Brake system maintenance should always be proactive not reactive. For a full understanding of how ABS, ESP, and Brake Assist systems integrate with your braking performance, explore the Mercedes Brake System Problems: ABS, ESP & Brake Assist Guide.
Author Bio
Mercedes Expert is an automotive technical trainer and Mercedes-Benz diagnostics expert with extensive hands-on experience in XENTRY, DTS Monaco, and advanced system troubleshooting. He specializes in transforming real workshop case studies into structured learning content to help technicians, car owners, and enthusiasts understand complex vehicle systems.
Last update: October 2025
