Table of Contents
Reverse Camera Not Working? Mercedes Diagnosis & Real Fix (W212 Case Study)
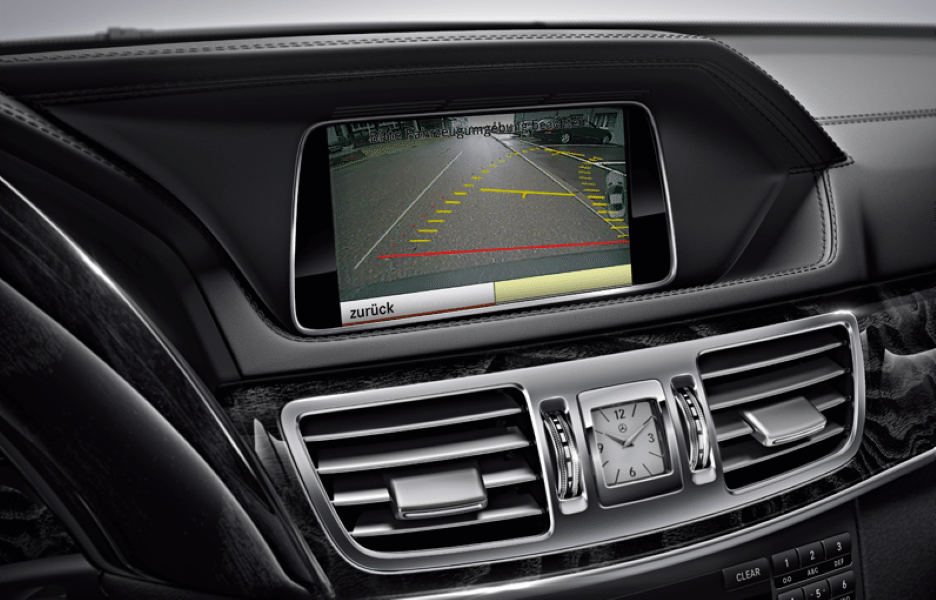
A malfunctioning reverse camera in your Mercedes-Benz isn’t just an inconvenience it can compromise safety, especially when parking or reversing in tight spaces. Drivers often see the warning “Reverse Camera Not Working” or notice a black or frozen display when shifting into reverse gear.
This issue is common across models like the E-Class (W212), C-Class (W205), and GLC (X253), and typically points to a communication fault between the head unit and the camera feed. In most cases, the system fails to receive a valid video signal or reverse-trigger input, preventing the display from switching to the rear view.
Common culprits include oxidized or loose connectors, broken tailgate wiring harnesses, faulty camera modules, or software and calibration faults within the MBUX or COMAND system. Understanding these causes and following a structured diagnostic approach is essential for accurate repair and long-term reliability.
For a complete pillar guide covering all Mercedes screen and camera issues including black dashboards, infotainment failures, and 360° camera calibration visit:
Mercedes Display and Camera Faults: Fix Dashboard, Screen Faults
Symptom → Cause → Quick Check
| Symptom | Likely Cause | How to Check | Fast Fix |
|---|---|---|---|
| Blank screen, no guidelines | Blown fuse / no power | Check camera fuse & 12–14 V at camera plug | Replace fuse, restore power |
| Works intermittently, flickers on bumps | Tailgate loom break / loose connector | Flex test the hinge harness; inspect oxidation | Repair loom; clean & reseat plugs |
| Black image but UI responds | Failed camera module | 12 V present, no image; DTC in HU/Park assist | Replace camera, code if needed |
| Reverse doesn’t auto-switch | Reverse trigger / selector fault | Check reverse lamp, 12 V trigger at HU in “R” | Repair reverse circuit / selector sensor |
| Distorted/shifted image | Calibration/software | Run XENTRY camera calibration / update HU | Calibrate/update software |
| Blurred image | Dirty/obstructed lens | Visual check, clean lens/flap | Clean lens; service flap mechanism |
Case Study: Mercedes E-Class W212 , Reverse Camera Dead
A Mercedes-Benz E-Class W212 arrived at the workshop with a common yet critical issue: the reverse camera stopped working completely.
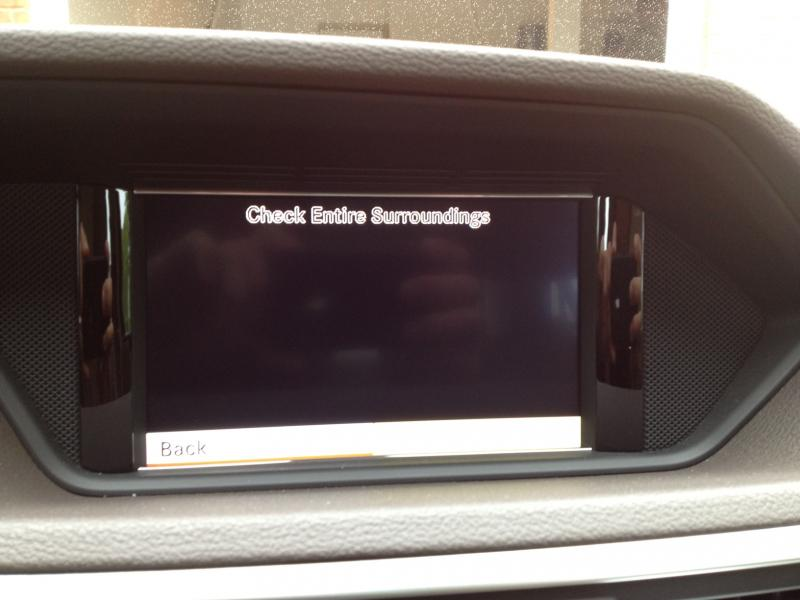
When the driver selected reverse gear, the display remained black, no parking guidelines appeared, and there was no “camera unavailable” message on the screen.
Interestingly, the parking sensors still functioned, confirming that the Parktronic system was active and the issue was isolated to the rear-view camera signal path.
Step 1 : Diagnostic Scan & Fault Confirmation
Using the Mercedes-Benz STAR/XENTRY diagnostic system, the technician initiated a full system scan focusing on the Parking Assistance and Rear Camera control units.
Findings:
- – Communication between modules was established successfully, ruling out a CAN bus failure.
- – However, a stored DTC appeared in the camera path: “Video signal invalid / no image transmission rear camera feed error.”
This combination communication OK but invalid video data typically indicates either a signal integrity issue (e.g., oxidized connector, broken coax cable) or an internal camera module fault.
Step 2 : Visual & Connector Inspection
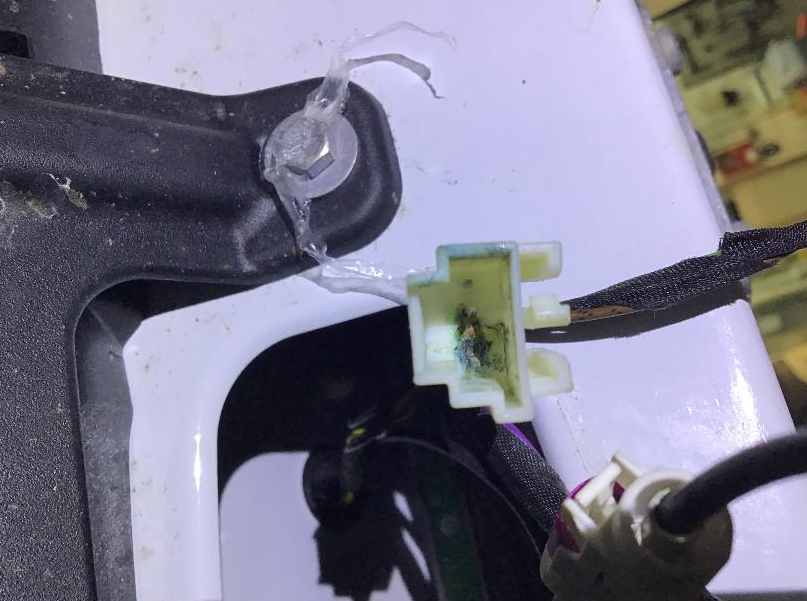
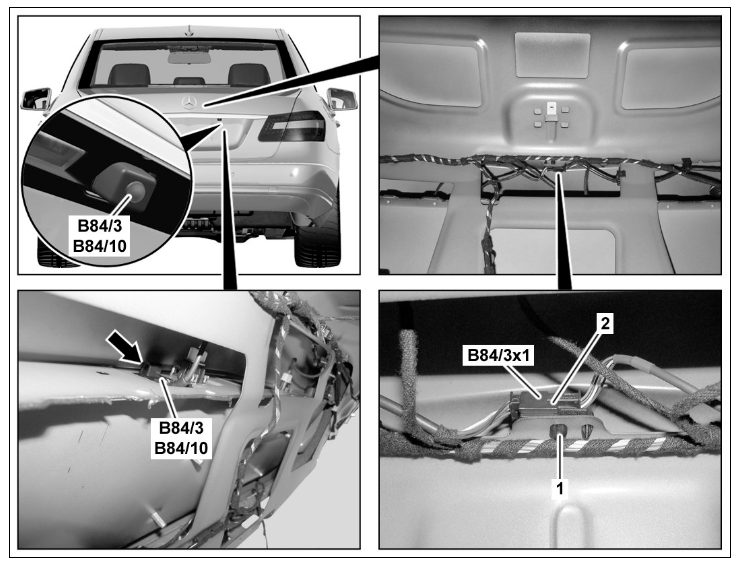
The technician next performed a physical inspection starting at the rear emblem assembly, where the reverse camera is integrated.
- – The camera lens was clean and undamaged no cracks or water intrusion visible.
- – Tracing the wiring into the trunk lid, the main connector feeding the camera was examined.
- – Upon disconnecting, clear signs of oxidation and light corrosion were visible on both male and female terminals.
This corrosion restricts the low-voltage video signal, even when power and ground are within spec.
Conclusion: Mechanical oxidation at the connector was the likely root cause.
Step 3 : Electrical & Trigger Circuit Testing
To confirm, the technician conducted a pin-by-pin electrical test:
| Test Point | Expected | Measured | Status |
|---|---|---|---|
| Power supply (KOEO) | 12 V ± 0.5 V | 12.3 V | OK |
| Ground continuity | < 0.3 Ω | 0.18 Ω | OK |
| Reverse trigger signal (HU input) | 12 V when in “R” | 12.1 V | OK |
| Video feed continuity | Stable signal | No output | Faulty |
All power and trigger inputs were correct, yet the camera produced no usable video output.
Interpretation: Power was fine, but the video path was compromised confirming the connector corrosion diagnosis.
Step 4 : Repair & Component Renewal
- 1. Connector Restoration
- – The oxidized pins were first cleaned using electrical contact cleaner and micro-abrasive tools.
- – Pin tension was adjusted to ensure firm mating pressure.
- 2. Pigtail Replacement
- – Despite cleaning, intermittent feed loss persisted when flexing the tailgate harness.
- – The technician replaced the camera connector pigtail entirely, splicing and sealing with heat-shrink solder sleeves to restore signal integrity.
- 3. System Reset & Verification
- – DTCs were cleared.
- – Ignition cycled and vehicle placed in reverse to validate image restoration.

Results:
- – The reverse camera feed instantly reappeared with full clarity.
- – Dynamic guidelines tracked steering angle correctly.
- – After hot/cold soak and tailgate flex tests, the image remained stable.
- – No DTCs re-logged during a final STAR diagnostic scan.
Outcome & Lessons Learned
Final Diagnosis: Oxidized rear camera connector causing intermittent or total video loss.
Repair Action: Connector pigtail renewal and sealing of tailgate harness.
Verification: Camera feed restored, system stable, fault memory clear.
Key Takeaway:
On the Mercedes-Benz W212, the tailgate camera connector and hinge-area harness are high-risk failure points. Even when voltage readings seem normal, oxidation can block the low-amplitude video signal, resulting in a black screen.
Always inspect connectors closely before suspecting the camera module or head unit. Preventive sealing and periodic inspection can avoid costly replacements.
Explore more verified case studies for Mercedes display and camera systems including black screens, 360° camera calibration, and infotainment communication faults in our master guide:
Mercedes Display and Camera Faults: Fix Dashboard, Screen Faults
DIY Checks (Safe & Useful)
- 1. Clean lens & flap: microfiber + non-abrasive cleaner.
- 2. Soft reset: key OFF 5–10 min or battery negative off (radio codes/settings may reset).
- 3. Fuses: locate camera/parking/infotainment fuses; replace like-for-like.
- 4. Reverse bulbs: confirm illumination some cars share trigger logic.
- 5. Tailgate loom: gently flex the hinge boot while in “R”; if image cuts in/out → loom repair.
If 12 V is present at the camera and the screen still stays black, the camera module or video line is likely faulty.
FAQs: Reverse Camera Not Working
Can I replace my backup camera?
Yes, you can replace your backup camera, and the process is generally straightforward, especially if you’re comfortable with basic automotive work. Here’s a step-by-step guide to help you through the process:
Step 1 : Purchase the Correct Replacement Camera
- – Ensure the replacement camera is compatible with your vehicle’s make and model. You can find this information in your vehicle’s manual or by checking online for compatible models.
Step 2: Disconnect the Battery
- – For safety, disconnect the negative terminal of your car battery to avoid any electrical shorts or shocks.
Step 3: Access the Old Camera
- – The backup camera is typically located in or near the rear license plate area or integrated into the trunk handle.
- – Use a panel removal tool or a screwdriver to carefully remove the panels covering the camera. Be cautious not to damage any clips or wiring.
Step 4: Remove the Old Camera
- – Unscrew or unclip the old camera. Disconnect the wiring harness attached to it. Note how the camera is connected, as you will need to connect the new camera in the same way.
Step 5: Install the New Camera
- – Connect the wiring harness of the new camera. If the connectors are not identical, you may need to splice the wires. Match the wire colors, strip the wires, and either solder them together or use crimp connectors.
- – For a secure connection, use heat shrink tubing or electrical tape to cover exposed wires.
- – Mount the new camera in the same position as the old one, ensuring it is securely attached and aligned properly.
Step 6: Test the Camera
- – Before reassembling everything, reconnect the battery and turn on your vehicle to test the new camera. Ensure the camera displays correctly on your dashboard screen and that the image is clear and properly oriented.
Step 7: Reassemble the Vehicle Panels
- – Once you confirm the new camera works, reassemble any panels or covers you removed during the process. Make sure all clips and screws are securely in place.
Step 8: Final Check
- – Perform a final check to ensure the camera is functioning correctly and that all panels are securely fastened.
How to reset Mercedes camera?
Resetting the camera system in a Mercedes-Benz often relates to recalibrating or reinitializing features like the parking assist, 360-degree camera, or lane-keeping assist. Here’s a step-by-step guide on how to reset or recalibrate the Mercedes camera system:
1. Perform a System Reset
If the camera system is malfunctioning or unresponsive, try a basic system reset:
- 1. Turn Off the Vehicle:
- – Turn off the engine and ensure all systems are off.
- 2. Restart the Vehicle:
- – Wait for about 10 minutes and restart the car. Sometimes, this can reset minor glitches in the system.
- 3. Cycle Through the Camera Views:
- – Access the camera system via the infotainment menu.
- – Switch between views (e.g., reverse, front, and 360-degree) to check if the issue persists.
2. Reinitialize the Camera System
Some Mercedes models allow reinitializing the camera system through the infotainment menu:
- 1. Navigate to the Camera Settings:
- – Go to the Settings menu on your COMAND or MBUX system.
- – Locate the Camera or Parking Assist settings.
- 2. Perform a Reset:
- – Look for options like “Reset to Factory Settings” or “Reinitialize.”
- – Confirm the reset and follow on-screen instructions.
3. Check for Blockages or Obstructions
Before delving into technical resets, ensure the camera lenses are clean and unobstructed:
- – Clean the camera lenses using a microfiber cloth.
- – Check for dirt, ice, or other obstructions that could hinder the camera’s functionality.
4. Use Diagnostic Tools (XENTRY or OBD-II Scanners)
For advanced troubleshooting or recalibration:
- 1. Connect a Diagnostic Tool:
- – Use a Mercedes-specific tool like XENTRY or a compatible OBD-II scanner.
- – Access the camera system via the scanner.
- 2. Check for Fault Codes:
- – Look for error codes related to the camera (e.g., “Front Camera Malfunction” or “Surround View Unavailable”).
- – Clear any stored fault codes.
- 3. Recalibrate the Camera:
- – Some scanners provide an option to recalibrate the cameras.
- – Follow the guided instructions for recalibration.
5. Software Updates
Outdated software can cause issues with the camera system. Check for updates:
- 1. Visit a Mercedes-Benz Dealer:
- – Ask for a software update for your vehicle’s camera and related systems.
- 2. Online Update via MBUX:
- – If your vehicle supports over-the-air updates, check for updates through the infotainment system.
— Salim, Mercedes Expert
Independent specialist in Mercedes-Benz diagnostics, CAN Bus analysis, troubleshooting case studies, and EV systems.