Table of Contents
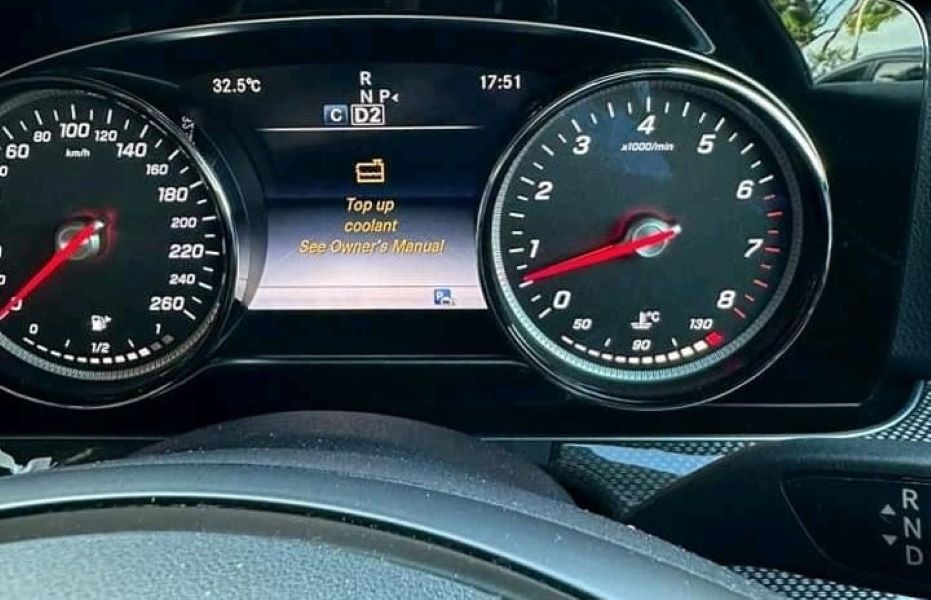
Case Study: “Top Up Coolant See Owner’s Manual” Warning in Mercedes-Benz E Class W213 (M274 Engine)
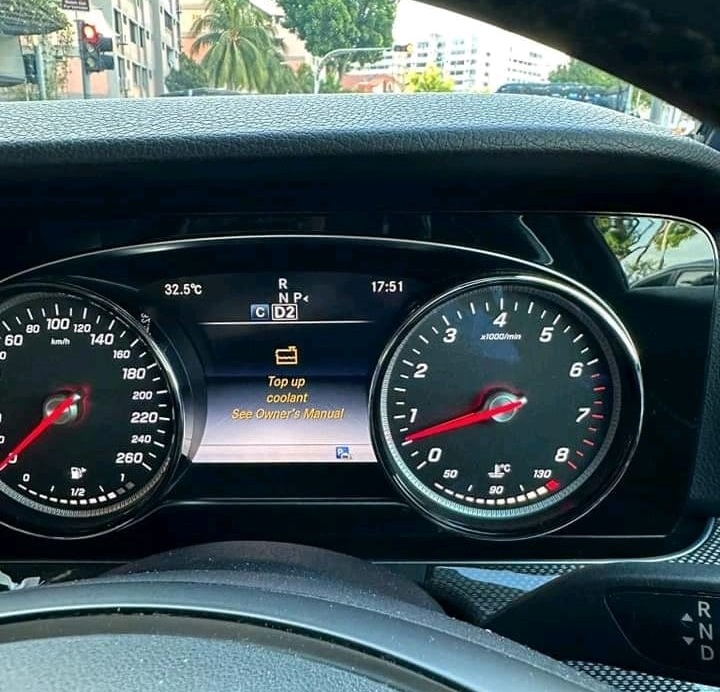
Modern Mercedes-Benz vehicles are equipped with advanced monitoring systems that alert drivers to potential issues before they cause major damage. One such alert is the “Top Up Coolant See Owner’s Manual” warning, which appears on the dashboard when the engine detects a problem with coolant levels.
In this case study, we’ll examine a Mercedes-Benz E Class W213 with the M274 Engine, brought to the workshop after the warning appeared. We’ll walk through the diagnosis, repair process, preventive measures, and key takeaways for owners.
Case Overview
- – Vehicle: Mercedes-Benz E Class W213
- – Engine: M274
- – Complaint: “Top Up Coolant See Owner’s Manual” warning displayed on the dashboard
The customer noticed the warning while driving and became concerned about overheating and possible engine damage.
Step 1: Understanding the Warning
The message usually indicates:
- – Low coolant levels (leak or evaporation)
- – Faulty coolant sensor
- – Malfunctioning cooling system component
Ignoring this warning can result in overheating, which in turn may cause severe engine damage such as warped cylinder heads or a blown head gasket.
Step 2: Diagnostic Process
The technician followed a structured approach to confirm the fault:
- 1. Verify Complaint The warning was indeed active on the instrument cluster.
- 2. Visual Inspection The cooling system was checked for signs of leaks or cracks.
- 3. Finding the Leak Water traces were detected in the coolant return line, indicating weakness or leakage.
This explained the low coolant level and the repeated appearance of the warning.
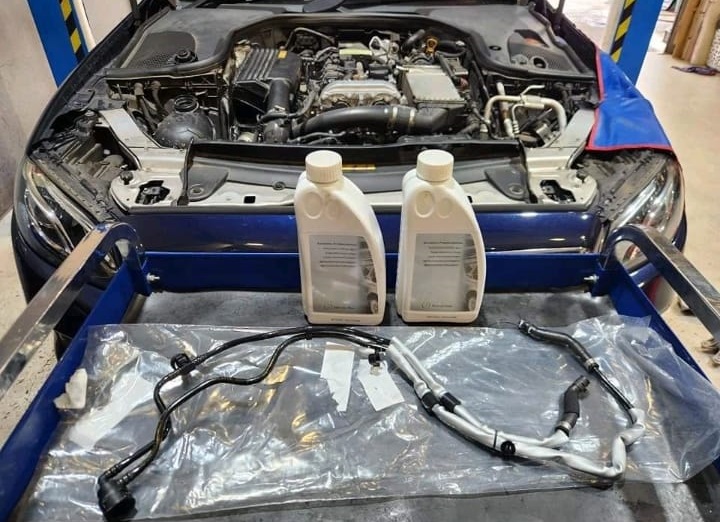
Step 3: Repair and Solution
Replacement of Coolant Return Line
The coolant return line is a vital component that maintains proper circulation of coolant. A leak or weakness in this line can result in loss of coolant, triggering the dashboard warning.
- – The defective line was removed.
- – A new genuine Mercedes-Benz coolant return line was installed.
Coolant Flush
After replacement, a coolant flush was carried out to:
- – Remove contaminated or old coolant
- – Eliminate air pockets that may cause overheating
- – Restore cooling system efficiency
Post-Repair Verification
- – The cooling system was pressure-tested to confirm no further leaks.
- – The warning message disappeared.
- – The system operated normally under test drive conditions.
More Mercedes Cooling System Resources
Want to explore more causes, symptoms, and repair tips for coolant leaks, overheating, and contamination?
Learn more about Mercedes cooling system faults in our full Cooling System Guide.
Quick Reference: Symptom–Cause–Fix
| Symptom | Possible Cause | Repair Solution |
|---|---|---|
| Dashboard warning “Top Up Coolant See Owner’s Manual” | Low coolant level due to leak or evaporation | Inspect and replace faulty coolant line or component |
| Visible water traces in engine bay | Weak or leaking coolant return line | Replace coolant return line |
| Overheating or fluctuating temperature | Coolant circulation disrupted | Perform coolant flush and bleed system |
| Warning persists despite top-ups | Faulty coolant sensor | Inspect and replace coolant level sensor |
Why a Coolant Flush Matters
After any cooling system repair, a flush is essential. Without it:
- – Residual oil, rust, or debris may remain inside the system.
- – Air pockets can cause overheating or misleading warnings.
- – The new component’s life may be reduced.
Performing a flush ensures the cooling system operates at peak efficiency.
Preventive Maintenance Tips
- – Check coolant level monthly Only when the engine is cold.
- – Use approved coolant Mercedes-Benz coolant (MB 325.0/325.6) prevents corrosion.
- – Inspect hoses and clamps Replace at the first sign of cracks or leaks.
- – Respond immediately to warnings Never ignore dashboard alerts.
How to Drain Coolant (DIY Guide)
Draining coolant is part of system maintenance or component replacement.
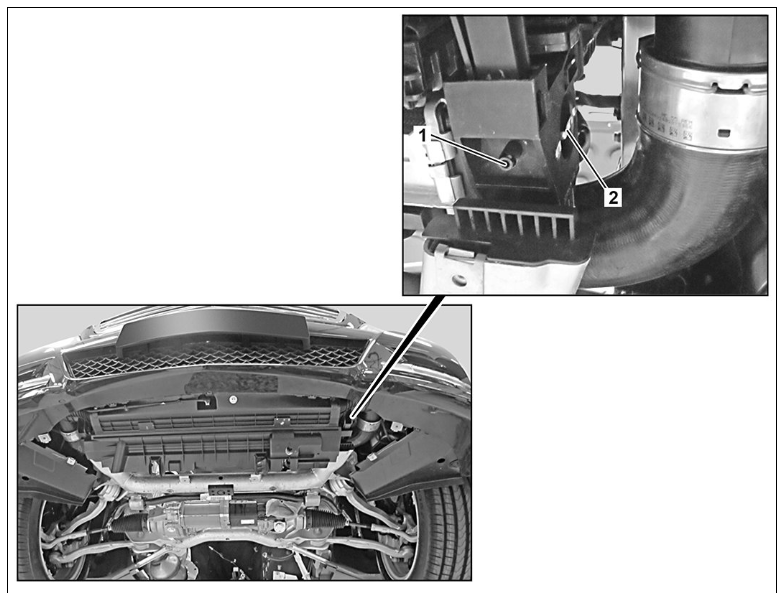
1. Draining
– Unscrew the coolant expansion tank cap.
– Remove the under-engine compartment cover.
– Slide the drain hose onto the drain fitting (1).
– Loosen the drain screw (2) on the radiator and drain the coolant.
2. Filling
– Tighten the drain screw (2) on the radiator and disconnect the drain hose from the drain fitting (1).
– Pour in the coolant and bleed/Flush the engine cooling system.
3. Control
– Check the engine cooling system for leaks.
– Reinstall the under-engine compartment cover.
How to Perform a Coolant Flush (DIY Guide)
Performing a coolant flush is an essential maintenance task that helps keep your engine running smoothly and prevents overheating. Over time, coolant can degrade, leading to reduced efficiency and potential damage to your engine. In this guide, we’ll walk you through the steps to perform a coolant flush, ensuring your Mercedes-Benz remains in top condition.
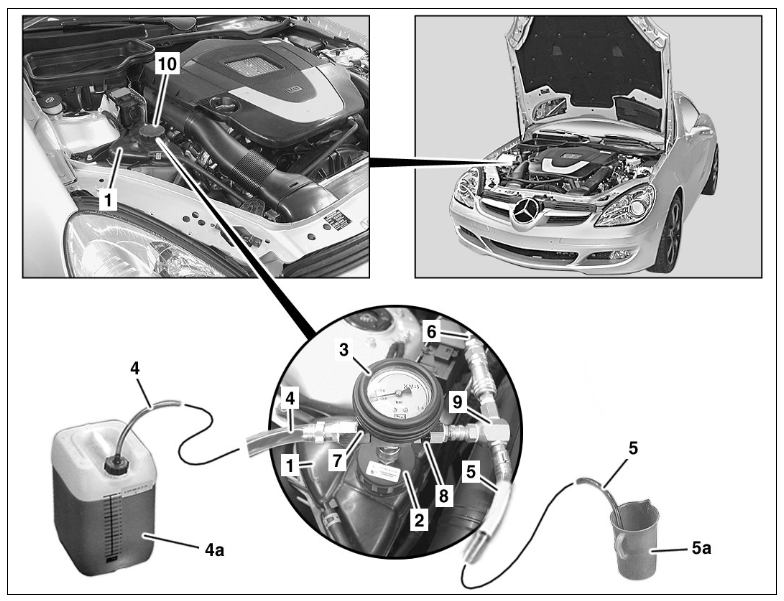
1- Position the coolant reservoir (4a) of the radiator filling device at the same height as the coolant expansion tank (1).
2- Unscrew the cooling system cap (10) and screw the control cap (2) onto the coolant expansion tank (1).
3- Attach the control unit (3) to the control cap (2).
4- Attach the Venturi nozzle (9) to the control unit (3).
5- Close the drain valve (8) and the inlet valve (7).
6- Connect the coolant inlet hose (4) to the coolant reservoir (4a). To prevent air from being drawn into the coolant reservoir (4a) and to ensure accurate measurement of the engine cooling system’s capacity, always fill the coolant reservoir (4a) completely.
7- Immerse the air vent hose (5) into an empty container (5a).
8- Connect the compressed air hose (6) to the Venturi nozzle (9) and supply it with pressure, There must be a pressure of at least approximately 8 bar in the compressed air supply so that the Venturi nozzle (9) can generate sufficient vacuum.
9- Open the drain valve (8), A vacuum is then produced in the engine cooling system.
10- Open the inlet valve (7) until the inlet hose (4) is filled with coolant, then close the inlet valve (7).
11- Close the drain valve (8) when the display on the control unit (3) is within the green range.
12- Remove the compressed air hose (6) from the Venturi nozzle (9) and check if the vacuum remains stable for 30 seconds, If not: Check the condition of the hoses and connections, repair them if necessary, and generate a vacuum again.
13- Seal the inlet valve (7) and the drain valve (8).
==> Always follow Mercedes-Benz service procedures and safety precautions.

What Happens If You Ignore the Warning?
Neglecting the “Top Up Coolant See Owner’s Manual” warning can cause:
- – Engine overheating Coolant loss prevents heat dissipation.
- – Component damage Water pump, radiator, and thermostat may fail prematurely.
- – Severe engine failure A cracked cylinder head or blown gasket can cost thousands to repair.
Conclusion
The case of the Mercedes-Benz E Class W213 with the M274 engine shows how quickly a coolant warning can escalate into a serious problem.
By diagnosing the coolant return line leak, replacing the component, performing a coolant flush, and verifying the repair, the issue was resolved efficiently.
For owners, the key takeaway is simple: never ignore coolant warnings. Acting promptly protects your engine, saves money, and ensures long-term reliability.
Frequently Asked Questions (FAQ)
Q1: What does “Top Up Coolant See Owner’s Manual” mean?
It means your coolant level is too low. This may be due to a leak, evaporation, or sensor malfunction.
Q2: Can I keep driving with this warning on?
No. Driving with low coolant can cause overheating and major engine damage.
Q3: How much does it cost to repair a coolant leak in a W213?
Minor repairs like replacing a coolant line may cost $300–$500. Complex leaks (radiator, water pump) may exceed $800.
Q4: What coolant should I use for my Mercedes E Class W213?
Always use Mercedes-Benz approved coolant (MB 325.0/325.6). Generic antifreeze may cause corrosion and void warranty.
Q5: Do I need to flush the coolant after repair?
Yes. A flush ensures contaminants and air are removed, preventing overheating and repeat warnings.
— Salim, Mercedes Expert
Independent specialist in Mercedes-Benz diagnostics, CAN Bus analysis, troubleshooting case studies, and EV systems.