Table of Contents
Mercedes Auxiliary Battery Warning: What It Means and How to Fix It
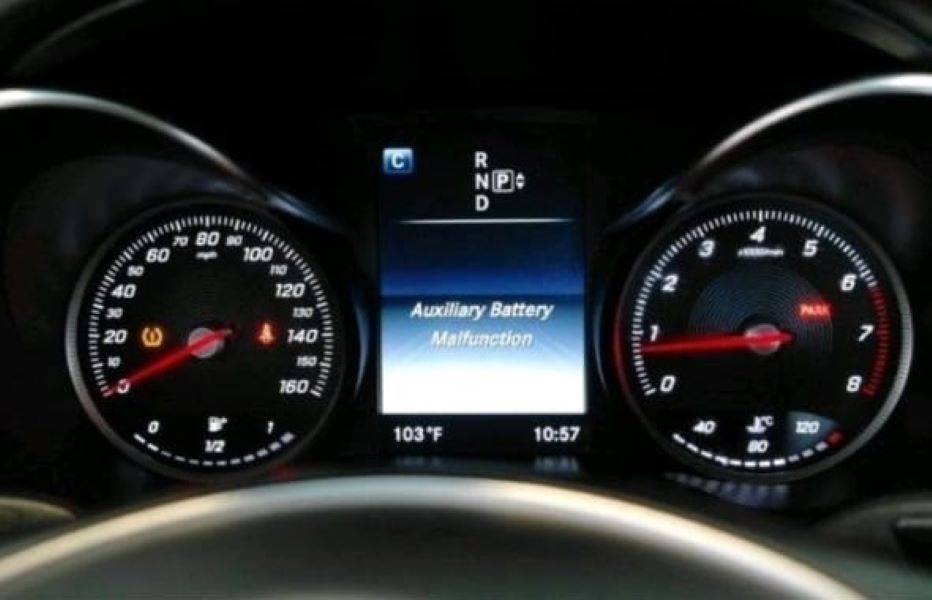
When your Mercedes Auxiliary Battery Warning appears on the dashboard, it doesn’t mean your car is about to fail but it is a signal that one of your vehicle’s most overlooked electrical components is underperforming.
This small yet critical auxiliary (buffer) battery supports functions like Start/Stop, EZS ignition, and emergency systems when the main battery is under load. Ignoring the warning can eventually trigger communication errors, Start/Stop deactivation, or ignition delays.
In this guide, we’ll explore:
- – What the warning means
- – Real-world diagnostics from a Mercedes-Benz C200 case study
- – How to locate and replace the faulty auxiliary battery
- – And how to prevent future electrical issues
Case Study: Mercedes-Benz C200, Auxiliary Battery Malfunction
Customer Complaint
A customer brought their Mercedes-Benz C200 to the workshop complaining of a recurrent “Auxiliary Battery Malfunction” message on the instrument cluster. The vehicle started normally, but ECO Start/Stop and COMAND memory were inconsistent.
Step 1: Full Diagnostic Scan (XENTRY)
Using Mercedes XENTRY Diagnostics, the technician ran a complete system test. The following fault codes were stored:
- – B21DC01 : Buffer battery of the electronic ignition lock (EIS/EZS): General electrical fault
- – 1321DC01 : Buffer battery of the ignition switch: Voltage below threshold
Interpretation: The auxiliary battery circuit feeding the EIS/EZS system had an undervoltage condition. Possible causes: a weak battery, poor ground, or a failing DC-DC converter.
Step 2: Voltage & Continuity Checks
| Test Point | Expected Value | Measured Value | Status |
|---|---|---|---|
| Main battery (rest / run) | 12.6 V / 14.1 V | 12.7 V / 14.0 V | OK |
| Auxiliary battery (rest) | ≥ 12.5 V | 11.1 V | Low |
| Converter output (Ignition ON) | 13.5–14.3 V | 12.0 V fluctuating | Weak charge |
| Voltage drop across aux feed | < 0.2 V | 0.34 V | Excessive loss |
| Ground resistance (aux → chassis) | < 0.1 Ω | 0.07 Ω | OK |
Findings:
The auxiliary battery was under voltage and the converter feed line showed a voltage drop, likely caused by minor corrosion under the passenger footwell.
Step 3: Visual Inspection
The technician accessed the auxiliary battery under the passenger footwell and discovered:
- – Light oxidation on the positive terminal
- – Damp carpet insulation from prior water ingress
- – Fuse #36 intact but showing slight verdigris on contacts
After cleaning and re-torquing, the warning temporarily disappeared but reappeared after a few drive cycles confirming battery degradation combined with converter under-charging.
Step 4: Repair Procedure
- 1. Isolate the system: Disconnected the main battery for safety.
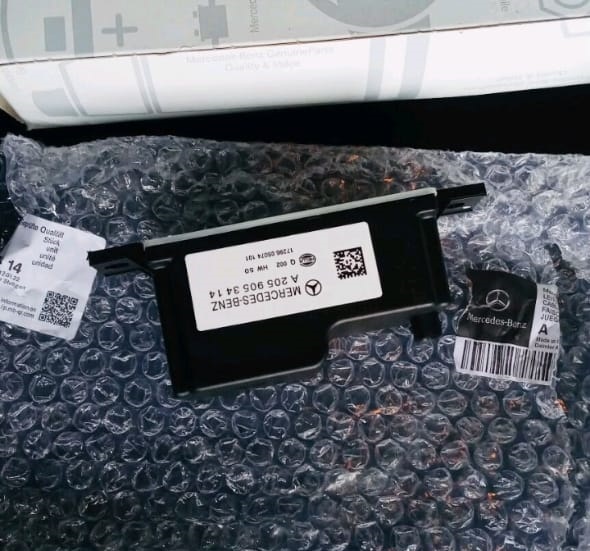
- 2. Remove and replace the auxiliary battery (12 V / 1.2 Ah AGM, genuine OEM).
- 3. Clean and re-pin positive connector terminal.
- 4. Test DC-DC converter output after installation, reading stabilized at 13.8 V.
- 5. Clear all DTCs using XENTRY, then perform a short adaptation drive.
Step 5: Post-Repair Validation
| Parameter | Before Repair | After Repair |
|---|---|---|
| Aux battery voltage | 11.1 V | 12.9 V |
| Converter output | 12.0 V fluctuating | 13.9 V steady |
| Start/Stop system | Inoperative | Fully functional |
| Cluster warning | Displayed | Cleared permanently |
| DTCs | Active | None after drive cycle |
Result: After multiple restarts and overnight testing, the auxiliary battery warning remained cleared. The system regained normal ECO Start/Stop functionality, and no parasitic drain was observed.
Step 6: Root Cause Analysis
| Component | Fault Description | System Impact |
|---|---|---|
| Auxiliary battery | Aged / low-capacity (11.1 V under load) | Undervoltage to EIS/EZS, warning triggered |
| DC-DC converter | Reduced charge output due to oxidation | Incomplete charging cycle |
| Connector terminal | Corroded pin | Added resistance and voltage drop |
Final Root Cause: Combination of aged battery and voltage drop in the converter feed circuit, causing intermittent undervoltage in the ignition module power supply.
Understanding the Auxiliary Battery’s Role
The auxiliary battery in a Mercedes-Benz supports essential systems including:
- – EIS/EZS ignition lock power retention
- – ECO Start/Stop voltage stabilization
- – COMAND & emergency call (SOS) system memory
- – Transmission parking pawl actuator
When this buffer fails, low-voltage errors like B21DC01 or B1D13 appear especially after engine start or voltage surges during cranking.
Common Causes of the Mercedes Auxiliary Battery Warning
| Cause | Effect |
|---|---|
| Natural aging (4–6 years typical life) | Reduced voltage capacity |
| Excessive heat exposure | Accelerated internal resistance |
| Water ingress under footwell | Corrosion and short circuits |
| Faulty DC-DC converter | Prevents aux battery from charging |
| Non-OEM replacements | Improper voltage calibration → recurring warnings |
Preventive Tips
- – Replace the auxiliary battery every 4–5 years or when resting voltage < 12.2 V.
- – Keep the footwell area dry moisture is the #1 cause of connector corrosion.
- – Use only genuine or VARTA-spec replacements (12 V 1.2 Ah AGM).
- – During maintenance, verify converter output ≥ 13.5 V with ignition ON.
- – Perform system resets after any 12 V or auxiliary work to ensure correct module voltage calibration.
Related Diagnostic Resource
If your Mercedes displays electrical warnings or communication faults beyond the auxiliary battery, explore:
Mercedes Electrical Problems: Fix SAM, ECU & CAN Bus Faults
A complete hub covering control-module voltage loss, short circuits, and CAN/LIN communication issues across modern Mercedes models.
This resource complements the auxiliary battery troubleshooting by showing how low-voltage conditions in the SAM or converter can trigger network errors and warning messages across the entire electrical system.
Where Is the Auxiliary Battery Located in a Mercedes-Benz C200?
In Mercedes vehicles, the location of the auxiliary battery can vary depending on the model and body configuration. The three most common locations are:
- 1. In the trunk (boot) ; near the fuse panel or spare tire area
- 2. Under the passenger footwell light ; tucked behind the carpet panel
- 3. Behind the driver-side upper dashboard panel
More information in the next article : How to Solve Auxiliary Battery Malfunction Mercedes Step by Step
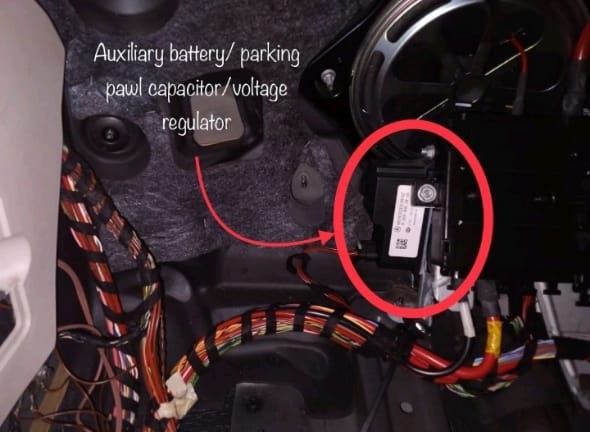
In the Mercedes-Benz C-Class W205 (including C200), the auxiliary battery is located under the passenger footwell light. To access it:
- – Remove the floor mat and carefully pull away the carpet section
- – Unscrew and lift the plastic panel under the glove box
- – You’ll find a small rectangular auxiliary battery mounted in a bracket
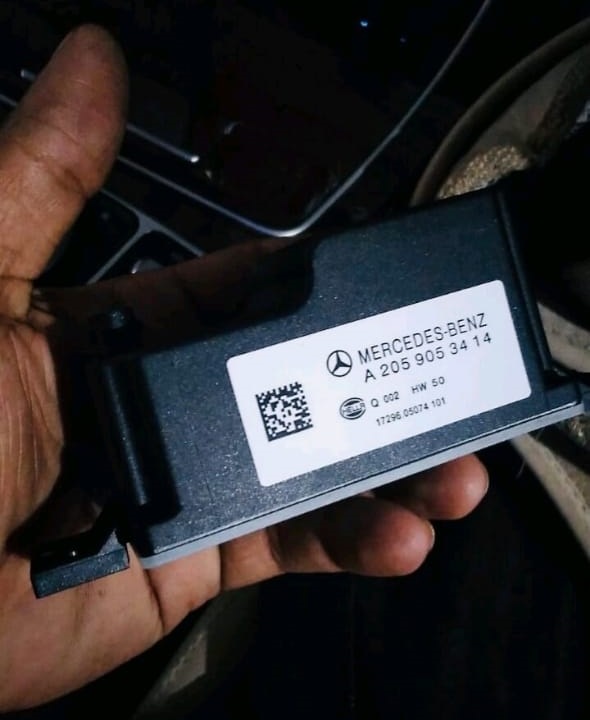
How to Replace the Auxiliary Battery
Here’s a quick guide to replacing the auxiliary battery in your Mercedes-Benz C200:
- 1. Disconnect the main battery (for safety)
- 2. Access the auxiliary battery location (under the passenger footwell)
- 3. Unclip the electrical connector attached to the battery
- 4. Remove the screws or clips holding the battery in place
- 5. Replace with a new OEM auxiliary battery
- 6. Reconnect everything and clear the fault codes using a diagnostic tool like XENTRY
After replacement, the Mercedes Auxiliary Battery Warning should disappear, and no new faults should appear after a test drive.
Pro Tip: Use Only Genuine Replacement Batteries
Always opt for an original or high-quality auxiliary battery with matching voltage and capacity (typically 12V/1.2Ah or similar). Cheap alternatives might trigger the warning again or underperform in cold weather.
Key Takeaway
Replacing the auxiliary battery in your Mercedes-Benz C200 is not just about clearing a warning it restores proper voltage stability for ignition, ECO, and comfort functions.
In this case, addressing both the battery and converter feed line ensured permanent resolution and prevented future voltage-related DTCs.
Small component, big impact maintaining your auxiliary battery means fewer electronic headaches and longer main battery life.
— Salim, Mercedes Expert
Independent specialist in Mercedes-Benz diagnostics, CAN Bus analysis, troubleshooting case studies, and EV systems.