
Fault Code C163691 — What It Means & XENTRY Data
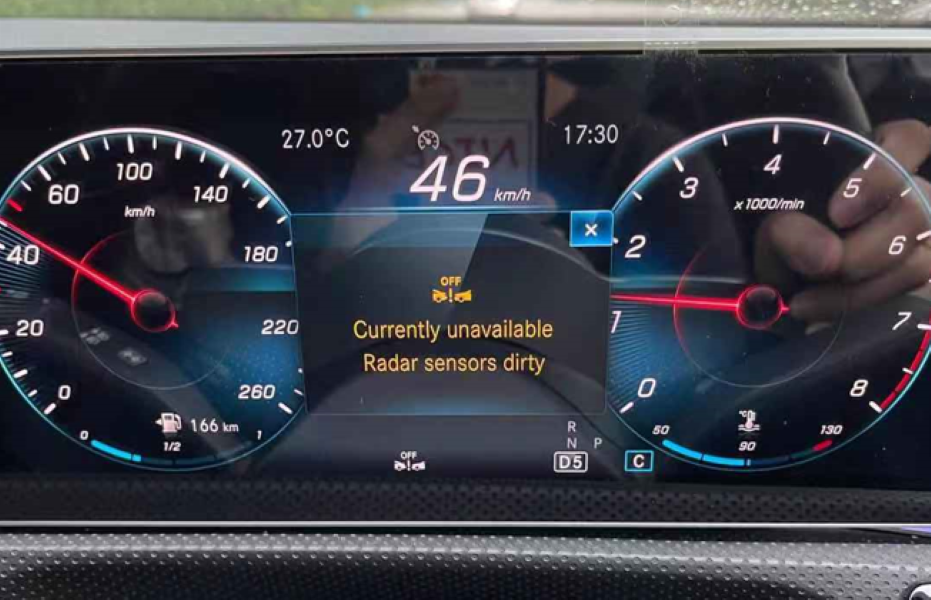
When “Radar Sensor Dirty” persists after cleaning, or appears after bumper repair or a collision, the diagnostic scan almost always reveals C163691. This is the most important fault code on this page — and the most misunderstood.
Status: Active and Stored
Related faults commonly stored alongside C163691:
C162C62 — Wheel speed sensor values implausible: signal comparison faulty
C174AFA — Calibration of Active Brake Assist control unit: malfunction (Current and Stored)
C174AFB — Calibration of Active Brake Assist: malfunction (Current and Stored)
C111FB — Radar sensor 1 blocked by dirt or foreign object (Stored)
U0418FE — Implausible data from Traction System control unit (Stored)
Post-collision / replacement additional codes:
B220662 — Current VIN incorrect or not present: signal comparison faulty
B182700 — Control unit coding incomplete
What C163691 tells you: The radar sensor’s calibration parameters are outside the permissible range — the sensor beam angle does not match what the ECU expects for the vehicle. This happens when the sensor has physically moved (bumper replacement, collision), when a new sensor has not been calibrated after fitting, or when the mounting bracket was bent during bodywork.
All Common Causes — Ranked by Frequency
| Rank | Cause | Key indicator | Fix |
|---|---|---|---|
| 1 | Mud, road grime, or snow on sensor area | Warning during or after driving in dirt/rain. Clears after cleaning. | Clean sensor area with microfibre + mild soap. No high-pressure water. |
| 2 | Radar misalignment after bumper repair | Warning appeared immediately after bodywork. C163691 stored. | Correct bracket angle. XENTRY/Autel calibration with targets. Mandatory. |
| 3 | AMG / aftermarket bumper incompatibility | Warning after cosmetic bumper upgrade. C163691 + B182700 stored. | Reinstall sensor in correct bracket for new bumper. Calibrate and code. |
| 4 | Heavy rain / water spray temporary blockage | Warning during motorway driving in rain. Clears automatically. | Inspect sensor housing seal. Clean if needed. Calibrate if C163691 stored. |
| 5 | Post-collision sensor replacement without coding | Warning after accident repair. B220662 + C163691 + B182700 stored. | VIN programming + control unit coding + radar calibration — all three required. |
| 6 | Wax or paint protection film over sensor zone | Warning after car wash, ceramic coating, or PPF application. | Remove film/wax from radar zone. Radar cannot penetrate these materials. |
| 7 | Corroded sensor connector | Intermittent warning, worse in wet weather. Persists after cleaning. | Inspect radar harness connector. Clean, treat with dielectric grease, reseat. |
Radar Sensor Location — Model by Model
“W205 radar sensor location” and “mercedes w205 radar sensor dirty” are among your most-clicked queries — people want to know exactly where to look. Here is the complete breakdown:

| Model | Radar location | Access | Note |
|---|---|---|---|
| C-Class W205 (standard bumper) | Behind Mercedes star emblem — centre grille | Remove star emblem (clips) | Most accessible — no bumper removal needed |
| C-Class W205 AMG / Panamericana | Lower bumper centre section | Remove lower grille insert | AMG bumpers have different bracket orientation |
| A-Class W177 | Behind lower front bumper — centre | Bumper removal required | Sensor behind lower grille mesh |
| CLA W118 | Behind lower front bumper — centre/right | Bumper removal required | AMG bumper bracket differs from standard |
| E-Class W213 | Behind Mercedes star emblem — centre grille | Remove star emblem | Same as W205 standard |
| GLC X253 | Behind Mercedes star emblem — centre grille | Remove star emblem | Sensor directly accessible |
| GLA X156/X247 | Lower front bumper — behind grille mesh | Remove lower grille section | Similar to A-Class access |
How to Clean the Radar Sensor — Correct Method
This is the first step for any “Radar Sensor Dirty” warning — takes 10 minutes and resolves a significant proportion of cases. Follow this exactly:
- 1Switch off the vehicle completely before touching the front grille or bumper area.
- 2Locate the sensor for your model using the table above. Do not assume — CLA/A-Class sensors are behind the lower bumper, not the emblem.
- 3Inspect the area first. Look for mud, snow, ice, insect debris, wax buildup, or any film/wrap covering the radar zone. Even transparent PPF blocks radar signal.
- 4Clean with a damp microfibre cloth and mild automotive soap. Wipe gently in straight strokes — not circular — to avoid scratching. No solvents, no household cleaners.
- 5Never use a high-pressure washer directly at the sensor. Pressure can displace the sensor inside its housing causing permanent misalignment that triggers C163691.
- 6Dry thoroughly with a clean dry microfibre. Restart the vehicle and check if the warning clears.
- 7If the warning does not clear after cleaning — scan with XENTRY or Autel before doing anything else. Do not assume the sensor needs replacing.
Case Study 1: Mercedes CLA W118 — AMG Bumper Misalignment & C163691
Initial Assessment
The owner had installed an AMG-style front bumper for cosmetic reasons. The warning appeared immediately after the modification — a clear sign that the radar sensor’s physical position had been compromised during the bumper swap. The sensor was not dirty and cleaning had no effect.

XENTRY Diagnostic Results

C174AFA — Calibration ABA control unit: malfunction — CURRENT and STORED
C174AFB — Calibration ABA: malfunction — CURRENT and STORED
C111FB — Radar sensor 1 blocked by dirt or foreign object — STORED
U0418FE — Implausible data from Traction System — STORED
Also stored (after bumper work):
C163691 — Front Radar Sensor calibration: parameter outside permissible range
B182700 — Control unit coding incomplete
Root Cause & Repair
With the bumper removed, the technician found the radar sensor module (A108) was not seated in its bracket at the correct angle. The AMG bumper uses a slightly different bracket orientation than the standard CLA bumper — the body shop had not adjusted for this, leaving the radar beam deflecting incorrectly.

The sensor bracket was repositioned to OEM specification for the AMG bumper configuration. The sensor face was cleaned. The system was then recalibrated using XENTRY ADAS calibration targets — positioning the target board at the factory-specified distance and height in front of the vehicle.
Case Study 2: Mercedes A-Class W177 — Heavy Rain Freeze Frame Data

Freeze Frame Data — What the Scan Revealed
A full system scan with the Autel diagnostic tool confirmed fault code C111FB: Radar sensor 1 is blocked by dirt or by a foreign object — stored in the radar control unit. Crucially, the freeze frame data captured the exact conditions at the moment of fault:


Findings & Key Insight
The freeze frame data perfectly matched the driver’s account — high speed, active wipers, heavy rain. No hardware fault was found. The sensor housing seal was inspected and found intact. The bumper area was cleaned and dried. All fault codes were cleared.
The system operated normally on the post-repair test drive. No warnings reappeared.
Case Study 3: Mercedes A200 W177 — Post-Collision Sensor Replacement & Mandatory Coding

Diagnostic Scan Results

These three fault codes together tell a clear story: a new sensor was physically installed but the three mandatory electronic steps — VIN programming, control unit coding, and radar calibration — were not performed. The CAN Bus can see the sensor but cannot trust its data.
Three-Step Repair Procedure
- 1VIN Programming: The new radar sensor was programmed with the vehicle’s VIN using the Autel diagnostic system. This registers the sensor on the CAN network and allows the ABA module to recognise it as the correct unit for this vehicle. Without this step, B220662 remains active.
- 2Control Unit Coding: The radar control module was coded to synchronise with the Active Brake Assist, ESP, and Pre-Safe systems. This establishes the data communication protocols and re-links the radar to the powertrain CAN Bus. Without this step, B182700 remains active.
- 3Radar Calibration: A calibration target board was positioned at the factory-specified distance and height in front of the vehicle. The calibration procedure via XENTRY/Autel aligned the radar beam angle within acceptable tolerances. Without this step, C163691 remains active.

Outcome
After all three steps were completed: B220662, C163691, and B182700 cleared successfully. Radar passed functional testing under static and dynamic conditions. Road test confirmed Active Brake Assist, Collision Prevention Assist Plus, and Adaptive Cruise Control all operating normally.
Radar Sensor Replacement — 3 Mandatory Steps
| Step | Procedure | Tool required | Fault cleared |
|---|---|---|---|
| 1 | VIN Programming — register new sensor on CAN network with vehicle VIN | XENTRY or Autel MaxiSys | B220662 |
| 2 | Control Unit Coding — synchronise module with ABA, ESP, Pre-Safe systems | XENTRY or Autel MaxiSys | B182700 |
| 3 | Radar Calibration — align beam angle using calibration target at specified distance/height | XENTRY + ADAS calibration targets | C163691 |
Frequently Asked Questions
— Salim, Mercedes Expert
Independent specialist in Mercedes-Benz diagnostics, CAN Bus analysis, troubleshooting case studies, and EV systems.