Quick Summary
“Active Brake Assist Functions Limited — See Owner’s Manual” means your Mercedes’s automatic emergency braking system has detected a fault and cannot guarantee full collision-avoidance intervention. Your standard brakes are unaffected. The most common causes are a dirty or misaligned front radar sensor, low main battery voltage causing CAN communication errors, moisture in radar wiring connectors, or a software fault in the Intelligent Drive control unit. In most workshop cases the fix is either radar cleaning and recalibration, or a battery replacement — neither requires engine work. Do not ignore the warning: if the system faults, it will not automatically brake for a pedestrian or slow vehicle ahead.

How Active Brake Assist Works
Active Brake Assist is part of the Mercedes Intelligent Drive safety suite. It continuously monitors the road ahead using three hardware components working in concert:
- Front radar sensor — mounted behind the front bumper near the Mercedes emblem. Tracks vehicles, cyclists and pedestrians at range.
- Multifunction camera — mounted behind the windshield. Detects lane markings, pedestrians and slow-moving objects at shorter range.
- Control units — IC Radar module, ESP control unit, and Distronic/Intelligent Drive module. These process sensor data and trigger braking commands.
When the system detects a collision risk above approximately 7 km/h (4 mph), it responds in three stages: first a visual and audible alert to the driver; then brake pre-charging to reduce reaction time; finally automatic emergency braking if the driver does not respond. At low speeds it can bring the vehicle to a complete stop. If any of these components develops a fault — a loose sensor, a weak battery, a software error — the system raises the “Functions Limited” warning and disables automatic braking intervention.
Common Causes of the “Functions Limited” Warning
| Cause | What Happens | Typical Fault Code |
|---|---|---|
| Radar sensor obstruction | Dirt, mud, snow or ice blocks the radar beam — system detects signal loss | B1B8700 / C180300 |
| Radar misalignment | Sensor shifted after bumper work or minor impact — aim is off-axis | C180400 — Radar sensor misaligned |
| Low or unstable battery voltage | Voltage below 12.4V causes CAN bus errors — IC Radar loses communication | U010087 — Lost comm. with IC Radar |
| Moisture / corrosion in connector | Water ingress at radar or harness connector causes intermittent signal dropout | B1B8500 / U-series CAN faults |
| Control unit fault | IC Radar or Intelligent Drive module internal failure or incomplete software update | C180600 / module-specific |
| Windshield or camera fault | Camera loses calibration after windshield replacement — triggers multi-system warning | B1E1300 — Multifunction camera |
Step-by-Step Diagnostic Flow: How to Fix “Active Brake Assist Functions Limited”
This is the correct diagnostic sequence used in workshop. Do not replace parts before scanning — the fault code pattern tells you which of the five causes is responsible.
Case Study 1 — Mercedes E-Class W213: Radar Misalignment After Minor Bump

Case Study 2 — Mercedes CLA 250: Multi-System ADAS Failure from Battery Voltage


Where Is the Radar Sensor Located?
On most Mercedes models — including the E-Class W213 and CLA W118 — the Active Brake Assist radar sensor is mounted inside the front bumper, offset to the right of centre behind the lower grille area, near the Mercedes emblem. The sensor itself sits in a plastic bracket bolted to the bumper reinforcement bar and faces forward with a clear line of sight through the bumper material (which is radar-transparent in that zone).

Model-specific notes:
- E-Class W213: Radar sensor on right side of lower bumper, behind the horizontal bumper beam. Bumper removal required for full access.
- CLA W118: Sensor in the same right-of-centre position, accessible after removing the lower bumper trim clips.
- Never place stickers, licence plate holders or tow bar covers over the radar zone — even partially radar-opaque materials degrade signal quality and will trigger obstruction faults.
- After any front parking sensor or bumper repair — even if the radar was not touched — always verify the sensor is correctly seated and recalibrate.
How to Remove the Radar Sensor — Mercedes E-Class W213
Radar sensor removal on the W213 requires bumper removal first. The sensor is not accessible from above the bonnet or through service ports. This procedure is for inspection and replacement — calibration must still be performed by a XENTRY or Autel-equipped workshop after reinstallation.
- Remove the front bumper — unclip the wheel arch liner extensions, remove the lower trim screws and the upper bumper retaining clips. Pull the bumper forward.
- Remove the bumper foam impact absorber — two bolts at either end of the reinforcement bar.
- Disconnect and remove the pedestrian protection sensors (if fitted) — they are clipped to the same lower bumper zone.
- Unlock the electrical connector at the radar sensor body and pull the connector free. Do not pull on the wiring loom.
- Remove the single retaining screw on the radar sensor bracket and slide the bracket forward.
- The radar unit detaches from the bracket — lift clear and inspect both the sensor body and the bracket mounting points for cracks or deformation.
How Mercedes Emergency Braking Works

The radar and camera process data continuously. When a collision risk is identified the system works in three timed stages. At approximately 2.6 seconds before projected impact a visual and audible alert fires. At approximately 1.6 seconds, if the driver has not braked, partial automatic braking begins alongside three rapid audible alerts. At approximately 0.6 seconds, if still no driver response, maximum automatic braking is applied. At low speeds the system can bring the vehicle to a complete stop. At higher speeds it significantly reduces impact severity even if it cannot prevent the collision entirely.
When the warning “Active Brake Assist Functions Limited” appears, this entire intervention sequence is unavailable. The vehicle will not automatically brake in an emergency. This is why the warning should be diagnosed and resolved promptly — not driven with indefinitely.
DIY vs Professional Diagnosis
| Task | DIY | Professional Required | Notes |
|---|---|---|---|
| Clean radar sensor area / bumper | ✅ Yes | — | Use soft cloth, no high-pressure jets at sensor |
| Check battery voltage (resting) | ✅ Yes | — | Below 12.4V at rest = suspect battery |
| Battery load test and replacement | Possible | Recommended | New AGM battery must be coded to vehicle via XENTRY |
| Fault code scan (XENTRY / Autel) | — | ✅ Required first step | Generic OBD tools miss IC Radar and camera module codes |
| Radar sensor inspection and re-seating | — | ✅ Bumper removal required | Must be followed by calibration regardless |
| Radar calibration | — | ✅ XENTRY or Autel only | Required after any sensor movement, replacement or bracket work |
| Software update / module coding | — | ✅ Dealer only | Incomplete updates can trigger persistent faults |
How to Prevent “Active Brake Assist Functions Limited”
- Keep the bumper radar zone clean — remove mud, insects and road film regularly. Do not use abrasive cloths or high-pressure jets aimed directly at the emblem area. The radar beam attenuates through heavy contamination even though the bumper material is radar-transparent.
- Avoid car wash brush systems over the radar zone — brush contact can displace the sensor in its bracket even without breaking the mounting. Use touchless washes or hand wash around the emblem.
- Recalibrate after any front-end work — bumper, grille, windshield, or parking sensor replacement all require radar recalibration even if the radar unit was not touched. The geometry of the sensor’s field of view is affected by adjacent components.
- Monitor battery health proactively — replace the main battery at 4–5 years regardless of whether it starts the car. A degraded AGM battery that cranks fine may still cause intermittent CAN communication faults under high electrical load, triggering all ADAS warnings simultaneously.
- Request a sensor alignment check at each service — takes 10 minutes with a scan tool and prevents the warning from appearing unexpectedly.
Mercedes Brake System Problems Hub
Active Brake Assist is one of several brake-related systems covered in the complete troubleshooting guide — including ABS faults, ESP warnings, Pre-Safe system errors and parking brake issues.
→ Mercedes Brake System Problems: ABS, ESP & Brake Assist GuideFAQs — Active Brake Assist Functions Limited Mercedes
What does “Active Brake Assist Functions Limited” mean?
It means your Mercedes’s automatic emergency braking system has detected a fault — in the radar sensor, camera, control unit, or power supply — and cannot guarantee full collision-avoidance intervention. Your standard brakes and ABS are unaffected; only the automatic braking function is impaired. The warning must be diagnosed and resolved: do not drive with it indefinitely.
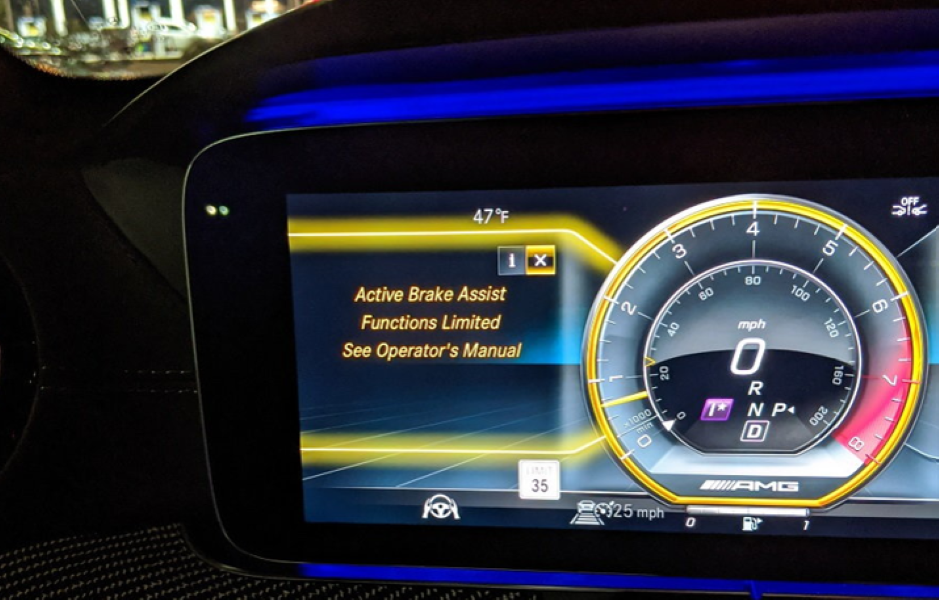
What does “Active Brake Assist Functions Limited — See Operator’s Manual” mean?
This is the same warning — “Operator’s Manual” and “Owner’s Manual” are interchangeable on different Mercedes model years and markets. Both indicate the same fault in the Active Brake Assist system. The manual reference tells you the system has flagged a condition that requires more than a simple reset. In most cases, radar cleaning, battery replacement or calibration resolves it.
Can I still drive with this warning?
Yes — your manual brakes and ABS continue to work normally. However, the automatic emergency braking will not activate if you fail to brake in time for a pedestrian, cyclist or slow vehicle. Drive with increased following distance and plan to get the fault diagnosed promptly. If the warning is accompanied by four or more simultaneous ADAS warnings, check battery voltage before driving any significant distance.
How do I reset the “Active Brake Assist Functions Limited” warning?
If the cause is a dirty radar sensor, cleaning the bumper and restarting may clear a temporary fault. For all other causes, the underlying issue must be fixed first (battery replaced, sensor re-seated, calibration performed) before codes can be permanently cleared via XENTRY or Autel. Simply clearing codes without fixing the root cause will result in the warning returning within the next drive cycle.
Why are all my ADAS systems warning at the same time?
Multiple simultaneous ADAS warnings (Brake Assist + Blind Spot + Lane Keeping + Distance Assist) almost always indicate a power supply problem — specifically low or unstable main battery voltage causing CAN bus communication errors across all modules. Check battery voltage immediately. If resting voltage is below 12.4V, or the battery is over 4 years old, replace it before any other diagnosis. XENTRY fault codes U0100xx or U0105xx confirm CAN communication loss.
How much does it cost to fix Active Brake Assist Functions Limited?
Cost varies significantly by cause. Radar cleaning and calibration alone: $150–$300. Battery replacement (with coding): $200–$450 depending on battery type and model. Sensor bracket replacement + calibration: $300–$600. Full radar sensor replacement + calibration: $700–$1,200. The majority of cases in workshop are resolved by battery replacement or radar recalibration — not sensor replacement.
— Salim, Mercedes Expert
Independent specialist in Mercedes-Benz diagnostics, CAN Bus analysis, troubleshooting case studies, and EV systems.