Table of Contents
Check Engine Mercedes GL; Case Study & Complete Fix
The Check Engine Light on Mercedes-Benz GL models can cause stress for any driver. Sometimes it’s a simple fault; other times it points to complex fuel or electrical issues. In this case study, we’ll explore a Mercedes-Benz GL450 equipped with the OM642 engine, where the Check Engine Light stayed on despite initial checks showing normal values.
This detailed walkthrough highlights the diagnostic process, repair steps, and root cause a faulty fuel rail pressure sensor.
This article is part of our Mercedes Check Engine Light – Complete Troubleshooting Hub, which provides in-depth guides, case studies, and expert repair solutions for Mercedes-Benz owners and technicians.
Vehicle Overview
- Model: Mercedes-Benz GL450
- Engine: OM642 Diesel Engine
- Customer Complaint: Check Engine Light illuminated continuously
Step-by-Step Diagnostic Process
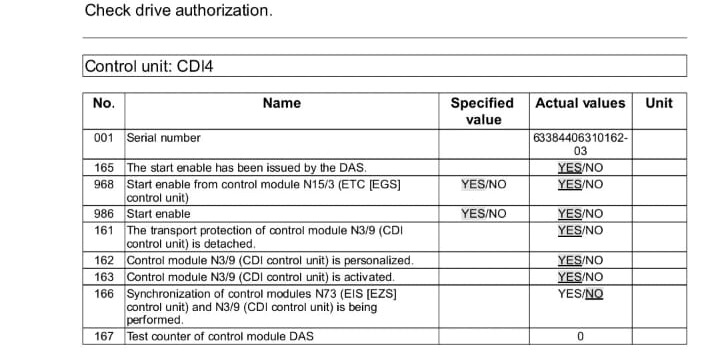
1. Initial Checks with Diagnostic Scanner
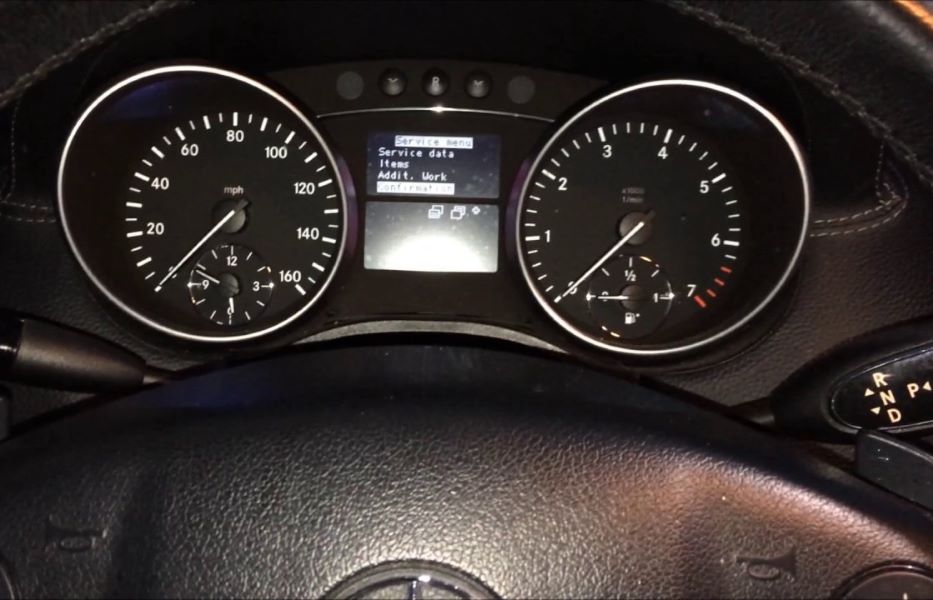
The first step was to connect the vehicle to a Mercedes-Benz STAR diagnostic system and read the live data values.
- – RPM: Normal
- – Fuel Pressure: Normal
- – Timing: Normal
- – Start Enabling: Normal
At first glance, nothing seemed wrong. This suggested a deeper electrical or sensor-related issue.
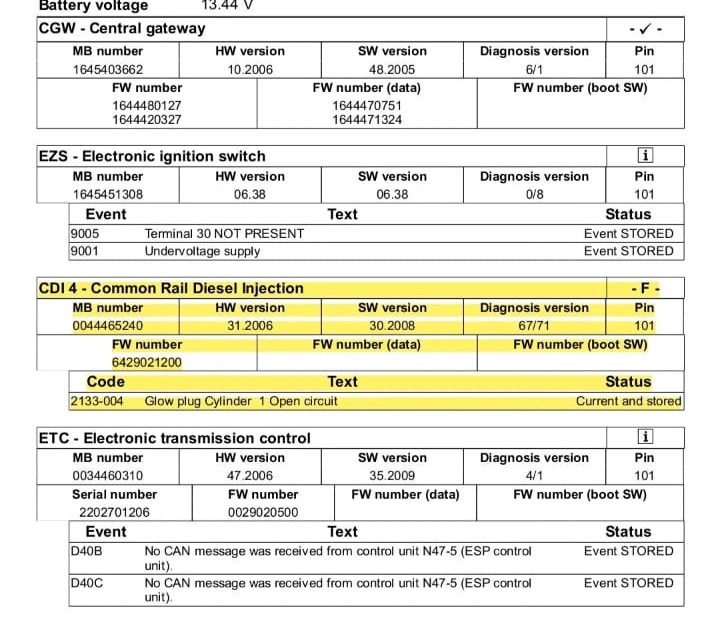
2. ECU Examination
The technician checked the Engine Control Unit (ECU).
- – Found: ECU had been cloned previously.
- – Wires: Several damaged wires visible.
=> The damaged ECU was replaced with an original OEM unit.
X However, the Check Engine Light stayed on, proving the fault was not resolved.
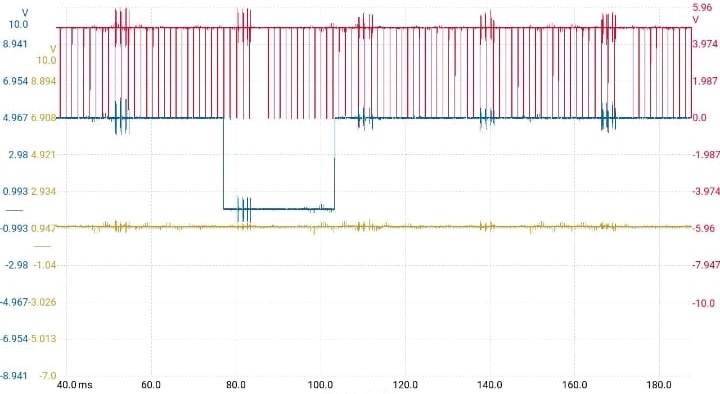
3. Advanced Testing with PicoScope
When basic checks didn’t solve the problem, a PicoScope was used for real-time waveform analysis.
- – Engine Timing → Correct
- – Low-Pressure Fuel Circuit → Fine
- – Injector Operation → Normal (mechanical & electrical)
But fuel pressure readings began to show suspicious fluctuations.
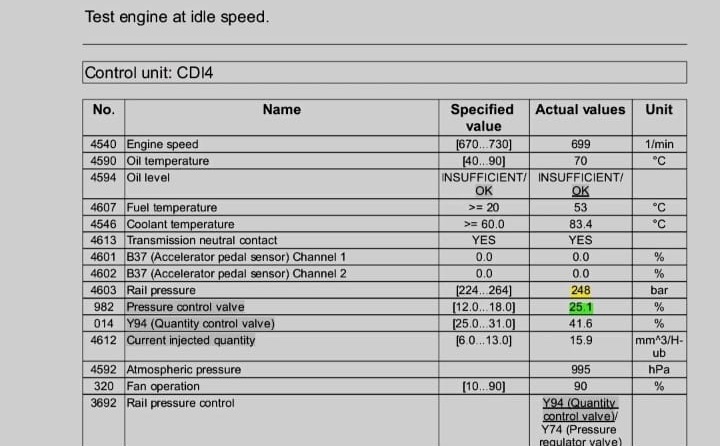
4. Pinpointing the Fault
- – The rail pressure quantity control valve checked out fine.
- – The fuel rail pressure sensor, however, showed inconsistent values.
Even though scanner readings looked normal, wave analysis exposed a fluctuating signal → confirming the sensor was faulty.
Repair Process: Replacing the Fuel Rail Pressure Sensor
Step-by-Step Replacement (OM642 engine)
- 1. Remove air intake duct after the air filter.
- 2. Disconnect the electrical connector from the rail pressure sensor (B4/6).
- 3. Remove turbocharger heat shield.
- 4. Remove engine lifting eye.
- 5. Unscrew the old rail pressure sensor from the fuel rail.
- 6. Seal the new sensor connection.
- 7. Screw in and torque the replacement sensor securely.
- 8. Reconnect the connector and reassemble components.
- 9. Use STAR Diagnosis to clear the fault memory.
After replacement, the Check Engine Light switched off. A test drive confirmed smooth performance with no further fault codes.
Symptom, Cause and Fix Table
| Symptom | Possible Cause | Fix |
|---|---|---|
| Check Engine Light on continuously | Faulty rail pressure sensor | Replace the fuel rail pressure sensor (B4/6) |
| Low power or hesitation | Fuel pressure not regulated properly | Inspect rail pressure control valve & sensor |
| Hard starting / no start | Sensor not sending correct data | Replace defective sensor, check wiring |
| Increased fuel consumption & emissions | Incorrect fuel-air ratio | Replace faulty rail pressure sensor |
Why a Bad Fuel Rail Pressure Sensor Triggers the CEL
The fuel rail pressure sensor is critical for diesel engines like the OM642:
- – It measures fuel pressure inside the rail.
- – Sends data to the ECU.
- – Helps regulate injector timing and quantity.
- – Maintains optimal combustion and efficiency.
A faulty sensor disrupts this feedback loop → leading to Check Engine Light activation, poor performance, or even no start.
FAQs: Check Engine Mercedes GL
What happens if the fuel rail pressure sensor goes bad?
- – Rough idling, misfires, or stalling.
- – Poor fuel efficiency.
- – High emissions due to incomplete combustion.
- – Starting problems.
- – Check Engine Light illuminated.
- – Potential long-term engine damage if ignored.
Where is the fuel rail pressure sensor located?
The sensor is mounted directly on the fuel rail (component B4/6), typically on top of the engine along the intake manifold.
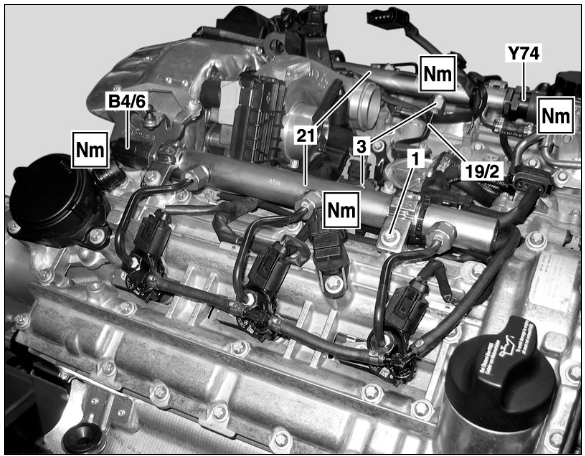
| 21 B4/6 | Common-Rail Ramps Fuel Rail Pressure Sensor |
Can I drive with a bad fuel rail pressure sensor?
It’s risky. The engine may lose power, stall, or fail to start. Driving with incorrect fuel pressure readings can damage the injectors, fuel pump, or catalytic system. Immediate repair is advised.
How much does it cost to replace a fuel rail pressure sensor in a Mercedes GL?
- Parts: €120–€250 (OEM sensor)
- Labor: 2–3 hours, €200–€400 depending on the workshop
- Total: €350–€650 (approx.)
Will replacing the sensor turn off the Check Engine Light?
Yes. Once the faulty sensor is replaced and fault memory cleared, the light will go off. If it doesn’t, further checks are required.
Key Lessons for Mercedes GL Owners
- – Don’t assume normal live values = no issue. Sometimes only advanced tools (PicoScope) reveal hidden faults.
- – Always check both the rail pressure control valve and sensor when fuel pressure issues arise.
- – Use genuine OEM parts for replacements to ensure long-term reliability.
Conclusion
In this Mercedes GL Check Engine case study, the root cause was traced to a faulty fuel rail pressure sensor even though initial scans showed normal values. Replacing the sensor resolved the issue, restored full performance, and turned off the warning light.
If your Check Engine Mercedes GL warning appears, don’t rely on surface-level scans alone. A systematic approach, combined with advanced diagnostics, can save time, money, and unnecessary part replacements.
For more case studies and troubleshooting guides, visit our Mercedes Check Engine Light – Complete Troubleshooting Hub.
— Salim, Mercedes Expert
Independent specialist in Mercedes-Benz diagnostics, CAN Bus analysis, troubleshooting case studies, and EV systems.