Table of Contents
How to Check Automatic Transmission Oil in Mercedes-Benz (7G-DCT, 7G-TRONIC, 9G-TRONIC)
Why it matters
Low or degraded ATF (automatic transmission fluid) causes harsh/late shifts, slip, overheating, and even worse premature transmission wear. Knowing how to check and set the level correctly protects performance and prevents expensive repairs.
Need a full maintenance view (Service A/B, tires, fluid intervals, 7DCT/9G guides)? See our Mercedes Maintenance and Service Guide.
Quick reference: transmission types & level-check method
| Transmission | Typical Models | Level-check method (summary) | Target fluid temp |
|---|---|---|---|
| 7G-DCT (7DCT300) | A/B/CLA/GLA | Warm at idle in N, remove dipstick-tube cap, check/adjust level; repeat checks; requires diagnostic initialization on many models. | Warm idle (per scan-tool spec) |
| 7G-TRONIC | C/E/S, SUVs | Fill via adapter at pan; run to ~60 °C; confirm overflow drip from level tube; secure plug. | ~60 °C |
| 9G-TRONIC | C/GLC/GLE/GLS/E/S | Use overflow tube + adapter; fill until controlled flow reduces at the specified temp; confirm with scan tool. | ~85–90 °C |
Exact temps/procedure vary by VIN. Always follow the service info for your vehicle.
Universal pre-checks (applies to all)
- 1. Park level, apply parking brake, wheels chocked.
- 2. Warm the transmission by idling or a short drive use a scan tool to monitor ATF temperature.
- 3. Remove undertrays where required to access pan/ports.
- 4. Inspect for leaks/damage before you start.
- 5. Use the correct ATF spec (e.g., MB 236.xx), new sealing washers, and the proper adapters.
Checking the automatic transmission fluid in Mercedes A-Class, B-Class, CLA and GLA
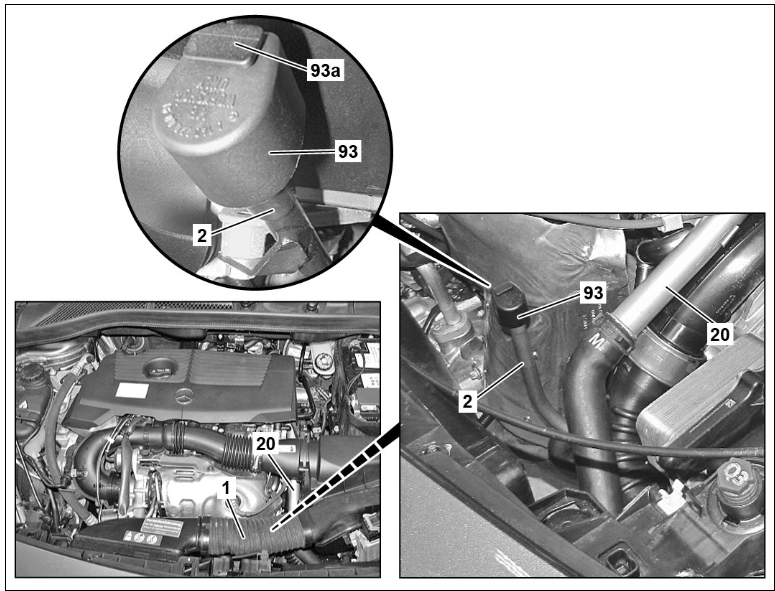
To check the automatic transmission oil level in compact Mercedes vehicles equipped with the 7G-DCT dual clutch gearbox, such as the Mercedes A-Class, B-Class, CLA, and GLA X156 and GLA H247, follow these steps:
- 1- Lift the vehicle using the hydraulic lift.
- 2- Remove the rear part of the lower soundproofing undertray.
- 3- Remove the rear part of the lower engine compartment trim.
- 4- Check the gearbox for leaks and exterior damage.
- 5- Perform an oil change.
- 6- Remove the engine air intake duct (1) before the air filter.
- 7- Read fault memory with diagnostic system and erase if necessary.
- 8- Apply the parking brake and start the engine.
- 9- Perform initialization with the diagnostic system.
- 10- Idle the engine in neutral to warm it up.
- 11- Unlock the cap (93).
- 12- Remove the cap (93) from the dipstick guide tube (2).
- 13- Check for a marking (white dot) on the cap (93).
- 14- Check the transmission oil level at idle speed and repeat the procedure 3 times.
- 15- Suck out or top up transmission oil.
- 16- Check the transmission oil level at idle speed and repeat the procedure 3 times.
- 17- Reinstall the cap (93) onto the dipstick guide tube (2) and press a new safety pin (93a) until it clicks into place.
- 18- Remove the vehicle’s diagnostic system.
- 19- Perform an engine operation test, check the gearbox for leaks and functionality.
- 20- Reinstall the rear part of the lower soundproofing undertray.
- 21- Install the rear part of the lower engine compartment trim.
- 22- Mount the engine air intake duct (1) before the air filter.
Procedure: 7g tronic oil level check
To check the automatic transmission oil level in compact Mercedes vehicles equipped with the 7G-TRONIC, such as the Mercedes C-Class, E-Class, S-Class and Mercedes SUV, follow these steps:
- 1- Lift the vehicle using the hydraulic lift.
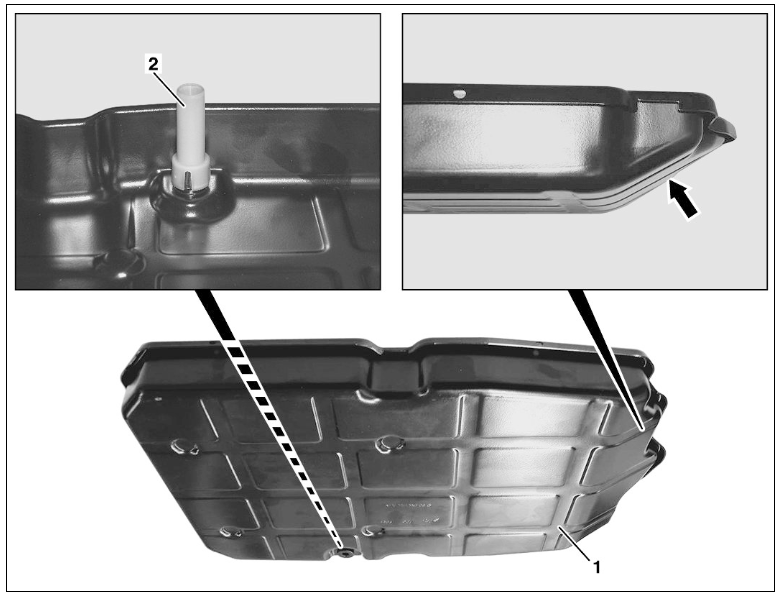
- 2- Inspect the gearbox oil pan.
- 3- Modified oil pan and overflow tube
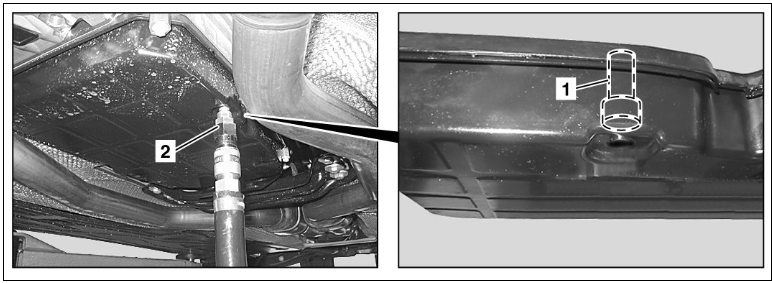
- 4- Loosen the drain plug (3).
- 5- Mount the adapter (2) and connect the oil distributor.
- 6- Pump 6 liters of gearbox oil into the gearbox.
- 7- Start the engine.
- 8- Connect the diagnostic system and determine the gearbox oil temperature.
- 9- Bring the gearbox oil temperature to 60°C/194°F.
- 10- Turn off the engine and allow the gearbox oil to cool.
- 11- Turn off the engine.
- 12- Determine the gearbox oil temperature.
- 13- Start the engine and let it run with the gearbox in the P (Park) position.
- 14- Allow approximately 4 liters of gearbox oil to drain, After gearbox and torque converter replacement.
- 15- Allow approximately 2 liters of gearbox oil to drain, When the torque converter has not been emptied.
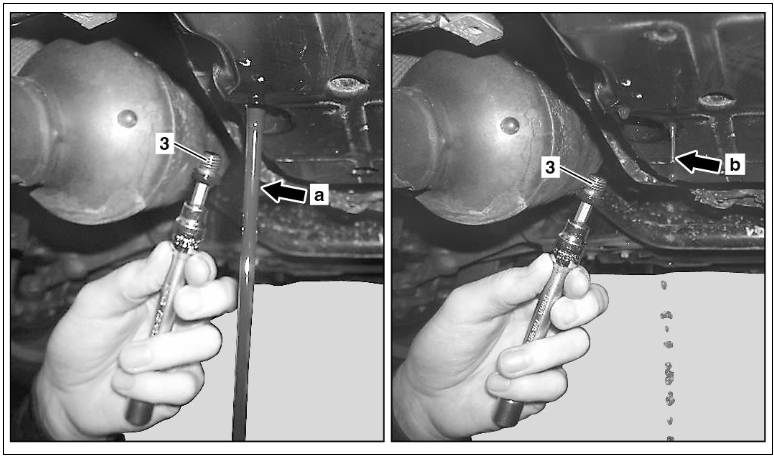
Adjust the gearbox oil level
- 1- Engage the P R N D gears repeatedly with the brake applied and the engine idling.
- 2- Shift the gearbox to the P (Park) position and let the engine idle.
- 3- Remove the adapter (2) from the oil pan.
- 4- Allow a steady flow of oil (arrow a) at the indicated gearbox oil temperature until the oil drips only (see correct oil capacity – arrow b).
- 5- Screw in the drain plug (3).
- 6- Turn off the engine.
Checking the automatic transmission fluid in Mercedes Sedan and Mercedes SUV with 9G-Tronic
To check the automatic transmission oil level in compact Mercedes vehicles equipped with the 9G-TRONIC, such as the Mercedes C-Class, E-Class, S-Class and Mercedes SUV sach as the Mercedes GLC, GLE and GL, follow these steps:

- 1- Position an appropriate oil collector under the gearbox.
- 2- Loosen the quick closure (1).
- 3- Position the overflow tube to fill with oil (position 1).
- 4- Install the adapter and connect the oil distributor.
- 5- Pump gearbox oil into the gearbox.

- 6- Start the inspection routine, check the gearbox oil level, and adjust if necessary.
- 7- Disconnect the adapter and oil distributor and tighten the quick closure (1).
- 8- Perform an engine operation test, check for leaks, and test the gearbox functionality.
- 9- Install the lower engine compartment trim.
Color/condition check (all gearboxes)
- – Healthy ATF: clear, red/amber, neutral odor.
- – Service due: dark, opaque, or burnt smell.
- – Metal on magnet/pan: a fine paste is normal; flakes/chips warrant further diagnosis.
Diagnostic & Check Flow
- – Park level, start engine and warm transmission via idle or test drive until fluid temperature target is reached (~60 °C for 7G, 85–90 °C for 9G).
- – Use a service lift or jack stands if required; remove underbody covers for access.
- – Perform the fill and measurement procedure tailored to your transmission type see above table.
- – For 9G-Tronic, verify with a diagnostic system such as XENTRY to confirm oil temperature and perform over‑flow fill step.
- – Observe fluid color: healthy ATF is amber/red and clear dark or burnt odor indicates need for service.
- – After confirming correct level, reinstall drain/fill adapters and trim covers.
- – Test drive to circulate fluid, then recheck level before finalizing.
Maintenance recommendations
- – Baseline interval: about 60,000 km (≈37,000 mi) for many Mercedes automatics; some models extend further.
- – Severe use (towing, hot/cold extremes, stop-go, mountains): shorten the interval.
- – Always verify by VIN/owner’s manual and use the exact MB 236.xx fluid.
DIY vs professional : what’s realistic?
| Task | DIY? | Notes |
|---|---|---|
| Basic visual check for leaks | Yes | Good first step before any level setting |
| 7G-DCT dipstick-tube level check | Partial | Often needs diagnostic initialization & repetition |
| 7G-TRONIC temp-based overflow set | Partial | Requires adapter + temp control around 60 °C |
| 9G-TRONIC overflow-tube method | Partial | Needs scan tool to hit 85–90 °C; special adapter |
| Full service (pan off, filter, magnets) | Yes/Partial | Possible at home with tools/torque specs; messy and precise |
| Adaptations/TSBs/software checks | No | Dealer/specialist with STAR/XENTRY recommended |
Troubleshooting quick table
| Symptom | Likely Cause | Action |
|---|---|---|
| Harsh/late upshifts | Low/old ATF; wrong spec | Set level at temp; correct fluid; consider service |
| Slip or flare | Low level; degraded friction modifiers | Level set + service with correct spec; evaluate further |
| Overheating message | Cooler restriction/old fluid | Service ATF; inspect cooler, lines, fan operation |
| Drip never stabilizes | Temp not in window; wrong tube position | Re-check temp with scan tool; verify procedure |
| Fresh fluid turns dark quickly | Internal wear/contamination | Professional diagnosis before further driving |
General “dipstick method” notes
Some older/non-sealed models have a service dipstick tube (often capped in red/black). If your car has one:
- 1. Warm to spec, engine idling, P or N per manual.
- 2. Clean dipstick, insert fully, read the HOT range.
- 3. Add small amounts at a time; recheck frequently to avoid overfill.
Many modern Mercedes are sealed and rely on overflow-level at a specific temperature no traditional dipstick.
FAQs: How To Check Automatic Transmission Oil
Q: How often should I change Mercedes ATF?
Many models are well served at ~60,000 km; others go longer. Severe use shortens intervals. Verify by VIN/owner’s manual.
Q: Can I mix ATF brands if the spec matches?
Stick to one verified MB 236.xx fluid. Mixing different chemistries can alter shift feel.
Q: Is “lifetime fluid” really lifetime?
In practice, heat and oxidation age ATF. Level checks and periodic changes improve longevity.
Q: Do I need a scan tool?
For 7G/9G overflow-type checks, yes you must monitor fluid temperature precisely.
Related guides
– Automatic Transmission Oil Change: Interval, DIY Steps & Cost
– Mercedes 9G-TRONIC Oil Change Guide: Cost & Interval
– 7DCT300 Oil Change: DIY Steps & Service Tips
— Salim, Mercedes Expert
Independent specialist in Mercedes-Benz diagnostics, CAN Bus analysis, troubleshooting case studies, and EV systems.