Table of Contents
Mercedes Parking Sensors Not Working ; Complete Troubleshooting & Fix Guide
When your Mercedes parking sensors stop working, and you no longer hear the familiar beeps or see visual indicators while parking, it usually means one or more ultrasonic sensors or wiring components in the PARKTRONIC system have failed.
This guide explains how to diagnose, repair, and maintain your parking sensor system using real-world Mercedes-Benz workshop procedures.
It also includes a case study demonstrating how a simple installation error led to a full system failure and how a professional diagnostic approach restored normal operation.
For a full overview of all Mercedes ADAS issues including radar, Blind Spot, and Parktronic faults explore our main hub:
Mercedes Driver Assistance System Faults: Radar, Blind Spot & Parktronic Fixes
Common Causes & Symptoms
| Cause | Symptoms | Quick Diagnostic & Fix |
|---|---|---|
| Dirt or debris on sensors | No beep or delayed alert | Clean all bumper sensors; even light mud can block ultrasonic signals. |
| Loose or unplugged sensor | One zone inactive | Inspect harness, reseat connector, or replace damaged wiring. |
| Blown Parktronic fuse or poor ground | System inactive | Check trunk fuse box and ground points; restore 12 V supply. |
| Damaged sensor or wiring | False alerts or constant red bars | Measure continuity and voltage, replace faulty sensors. |
| Control module failure | No progression or activation | Scan via XENTRY, test CAN lines, recalibrate or replace module. |
| Weak main or auxiliary battery | Sensors intermittent | Test voltage; replace if below 12.4 V. Many parking faults trace back to low battery power. |
Diagnostic & Repair Flow
- 1. Clean sensors thoroughly : remove mud, road film, or ice from all bumpers.
- 2. Check fuses : test for 12 V supply in the Parktronic circuit (often in trunk fuse panel).
- 3. Inspect connectors : ensure no corrosion, moisture, or loose pins.
- 4. Scan for fault codes : common codes: B1023, B1248, PTS A12500
- 5. Repair or replace : damaged harness or sensors; seal connectors properly.
- 6. Test operation : confirm audible and visual indicators react correctly in all zones.
Case Study: Mercedes-Benz G-Class , Parking Sensors Not Working
Vehicle Information
- Model: Mercedes-Benz G Class 2017
- System Affected: PARKTRONIC Parking Assist
- Customer Complaint: “Parking sensors not working” no beeps or visual alerts
- Diagnostic Tool Used: Mercedes-Benz STAR XENTRY
Customer Complaint Overview
A Mercedes G-Class owner reported that the parking assist system stopped functioning completely no audible beeps, no visual indicators, and no activation when reversing. Given how frequently this system is used for tight parking situations, the customer wanted a quick and reliable diagnosis to restore full functionality.
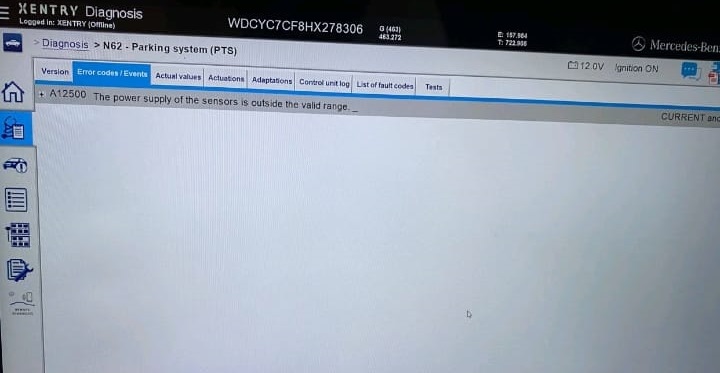
Step 1: Initial Diagnostic Scan
Using the Mercedes STAR XENTRY diagnostic tool, the technician performed a full system scan.
Fault Code Detected:
PTS A12500 – Power supply of the sensors is outside the valid range. Self-test failed.
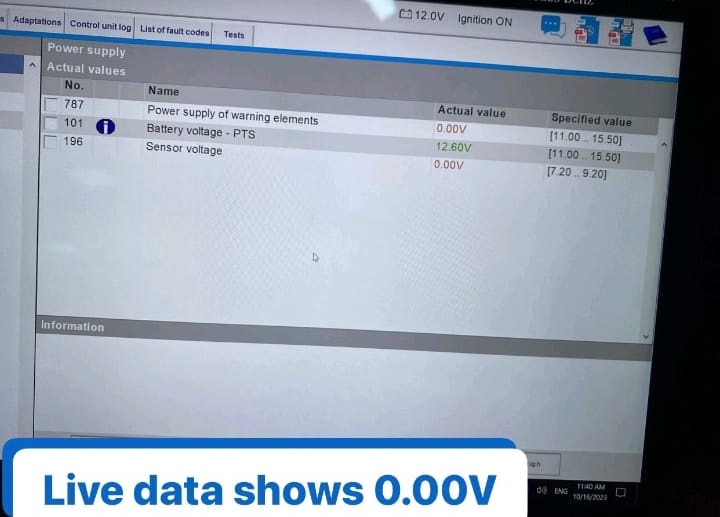
Live Data Results:
- – Sensor voltage readings were 0.00 V, whereas normal operating voltage should range between 6.0 V and 10.0 V.
- – This suggested a power distribution issue, not a sensor communication fault.
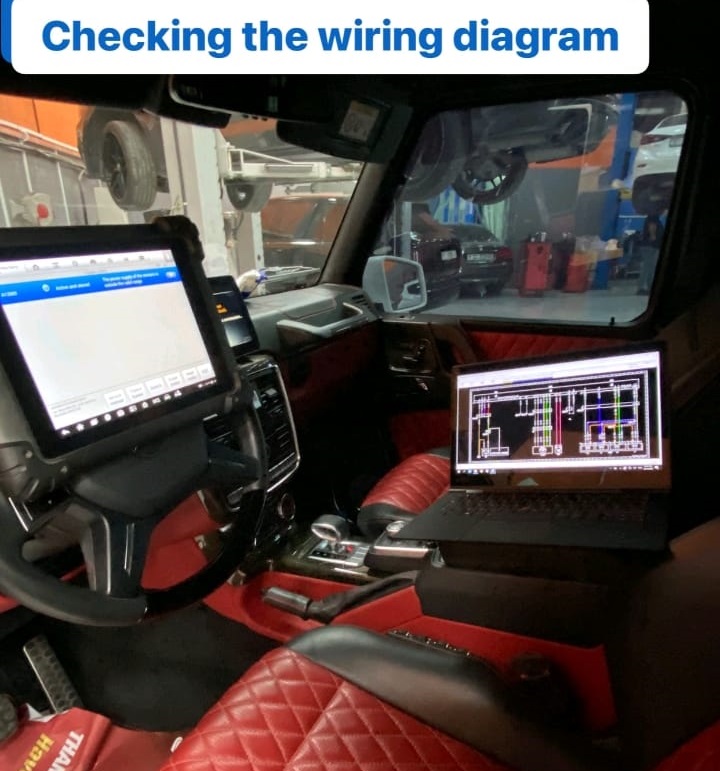
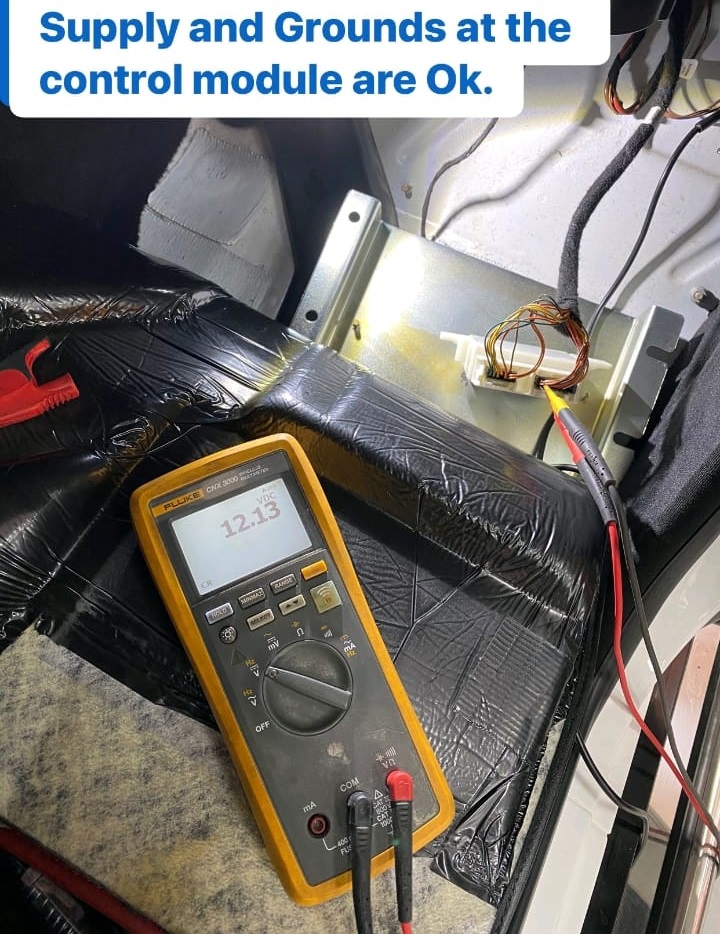
Step 2: Power Supply Verification
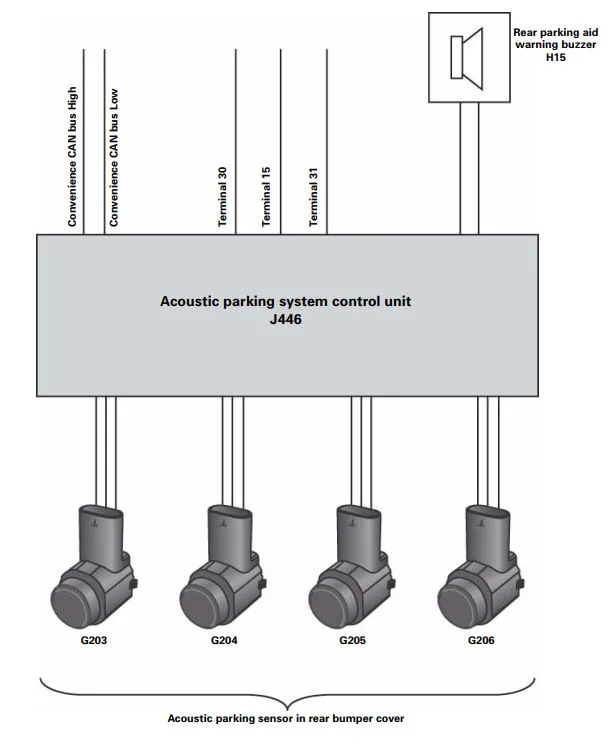
Next, the technician verified the power supply to the parking control unit using the wiring diagram.
- – The control unit power input and ground lines were normal, confirming that the issue was not upstream of the control module.
- – The problem appeared to occur between the control unit and the sensors possibly in the harness or connector region.
Step 3: Voltage Drop Investigation
To confirm this suspicion, the technician monitored sensor voltage while reconnecting the front sensor harness.
Each time the connector was attached, the voltage across the system dropped sharply, confirming an internal short or resistance fault caused by poor harness or connector integrity.
Detailed Physical Examination
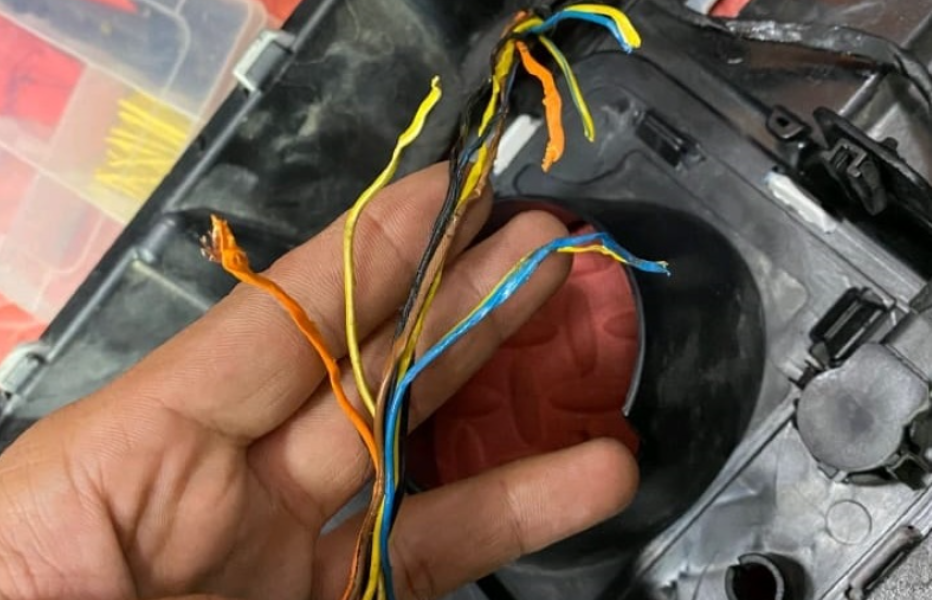
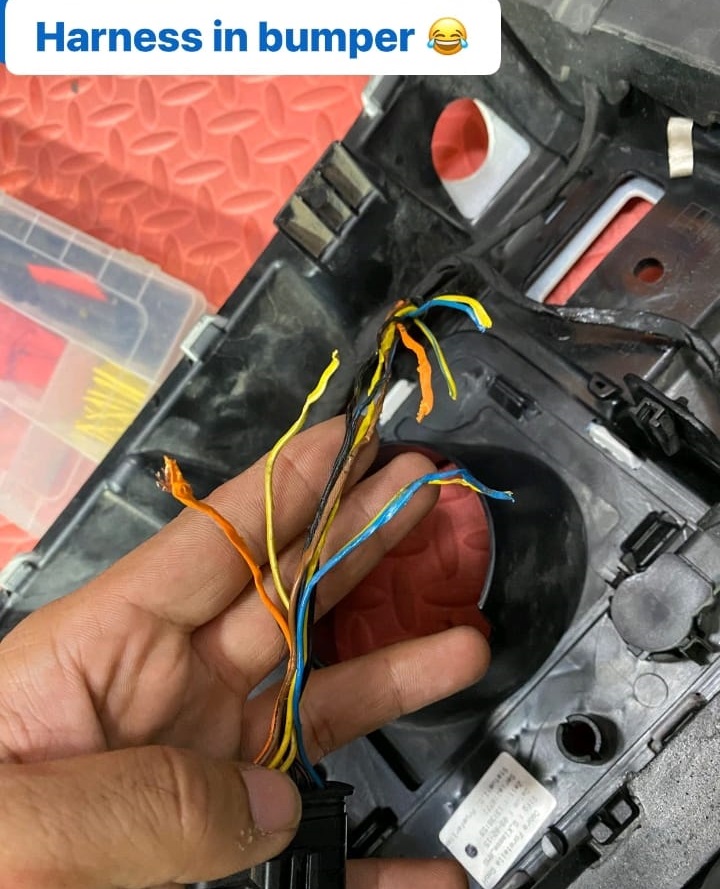
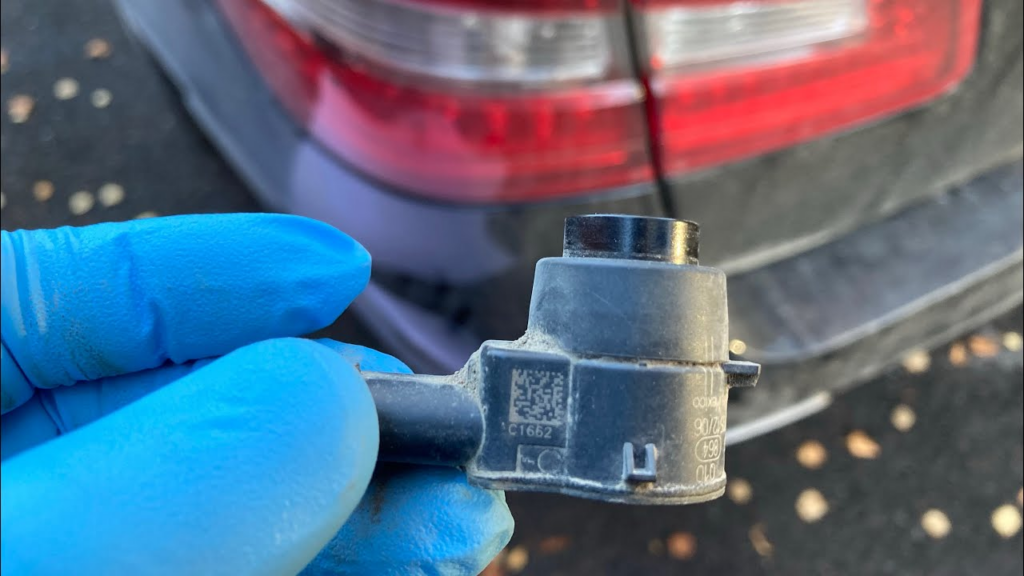
Front Bumper and Harness Inspection
The technician removed the front bumper assembly to visually inspect the harness and sensor connections.
Upon removal, a clear installation issue was found:
- – The bumper had previously been refitted incorrectly by a body shop, twisting and pinching the wiring harness.
- – This improper routing caused partial shorting and intermittent voltage loss across multiple sensors.
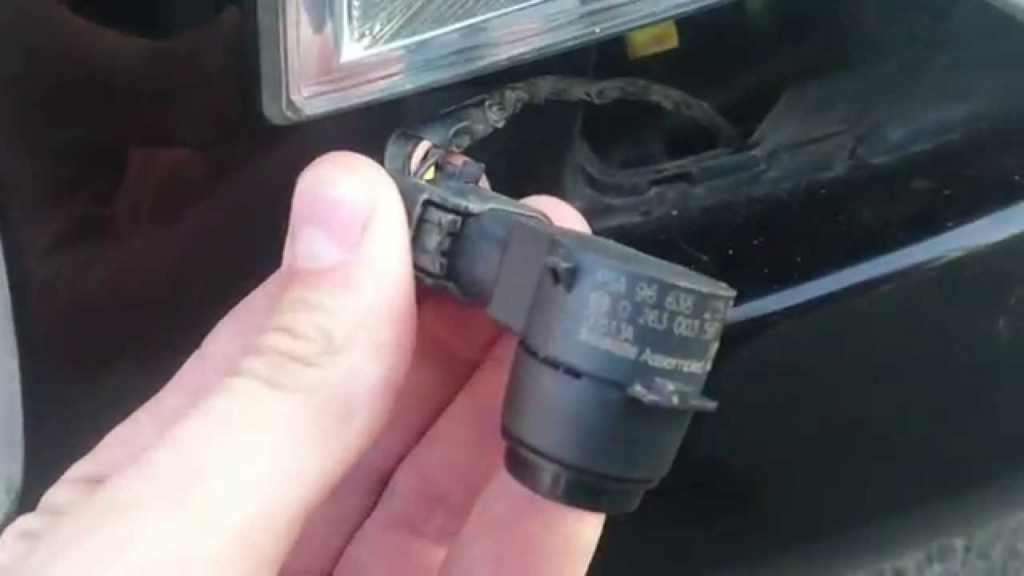
Connector Condition
Further inspection revealed moisture and corrosion on the front sensor connectors, contributing to electrical resistance and false readings.
Findings
The root cause was mechanical damage and misalignment from an improper bumper installation after body repairs.
This caused unstable voltage at the PTS sensors, making the system interpret the sensors as offline or faulty.
Step 4: Repair and Solution Implementation
1. Harness and Connector Repair
- – The technician reinstalled the front bumper correctly and replaced the damaged section of the sensor harness.
- – Connectors were cleaned, treated with dielectric grease, and sealed to prevent future water ingress.
2. System Recheck
- – After reassembly, the voltage readings returned to normal between 6.5 V and 9.5 V across all sensors.
- – The PTS A12500 fault code was cleared successfully.
3. Functional Testing
- – The system was retested using XENTRY live data, confirming accurate sensor activation in all zones.
- – A practical parking test verified that the audible and visual alerts responded correctly to nearby obstacles.
Outcome & Workshop Insight
After proper reinstallation and rewiring, the PARKTRONIC system was fully restored.
No fault codes reappeared during subsequent tests, and the driver confirmed the system operated normally.
Expert Note:
“Seemingly complex parking assist failures often trace back to simple physical installation errors. Always inspect the wiring harness and connectors before replacing sensors or control units.”
Key Takeaways
- – Incorrect bumper installation can cause sensor voltage drops and system-wide faults.
- – Moisture ingress is a common secondary factor that accelerates corrosion and signal loss.
- – Diagnostic scans should always be paired with physical inspections for accurate fault tracing.
- – Proper sealing and correct routing during repairs prevent future electrical failures.
Learn More
This case study is part of our in-depth Mercedes Driver Assistance System series, which covers radar, camera, and sensor-related faults.
For more diagnostic insights, visit our main hub:
Mercedes Driver Assistance System Faults: Radar, Blind Spot & Parktronic Fixes
DIY vs Professional Repair
| Task | DIY-Friendly | Professional Recommended |
|---|---|---|
| Cleaning sensors | OK | — |
| Checking fuses & voltage | OK | — |
| Re-seating connectors | Intermediate skill | — |
| Scanning fault codes | Needs OBD-II | (XENTRY) |
| Module or harness repair | NO | Dealer or ADAS specialist |
How to activate parking sensors on mercedes a class
How to Activate Parking Sensors on Mercedes A-Class is a common question for drivers who want to make full use of the car’s advanced safety features. In most Mercedes A-Class models, including the Mercedes- Benz A Class W177
How to Activate Parking Sensors on Mercedes A-Class – Step-by-Step
1. Start the Engine or Turn On the Ignition
Ensure your Mercedes A-Class is on by starting the engine or switching the ignition to position II.
2. Engage Reverse Gear
The parking sensors activate automatically when you shift into reverse. You’ll hear a beep and see visual indicators on the infotainment screen.
3. Use the Park Assist Button (If Needed)
If you want to activate the sensors manually (without reversing), press the Park Assist button on the dashboard or center console marked with a “P” and soundwave icon.
4. Drive at Low Speed
The sensors also engage automatically when driving at low speeds (usually under 10–15 km/h), especially near obstacles.
5. Check for Visual & Audio Alerts
Once active, the system will display distance bars on the screen and emit beeps as you approach objects. The closer you get, the faster the beeping.
6. Keep Sensors Clean
Ensure the front and rear bumpers, where the sensors are located, are clean and free from dirt or snow to ensure proper function.
Mercedes parking assist not working?
Parking assist can fail for a variety of reasons, including:
1. Physical Damage:
- – Impact or Collision: Parking sensors are often located on the bumper, making them vulnerable to damage from minor collisions, parking bumps, or road debris.
- – Weather Exposure: Harsh weather conditions, such as extreme heat, cold, or moisture, can damage sensors over time.
2. Electrical Issues:
- – Wiring Problems: Faulty or corroded wiring can disrupt the electrical connection between the sensors and the control unit.
- – Connector Issues: Loose or damaged connectors can cause intermittent or complete failure of the sensors.
3. Dirt and Debris:
- – Obstructions: Dirt, mud, snow, or other debris can cover the sensors, preventing them from accurately detecting objects.
- – Cleaning Products: Some cleaning agents can leave residues on the sensors, affecting their performance.
4. Sensor Malfunction:
- – Manufacturing Defects: Occasionally, sensors may fail due to defects in manufacturing.
- – Wear and Tear: Over time, sensors may degrade and become less effective or stop working altogether.
5. Software Issues:
- – Software Glitches: The vehicle’s onboard computer system may experience software glitches that affect the sensor system.
- – Updates Needed: Outdated software might not properly communicate with the sensors, requiring an update or reprogramming.
6. Improper Installation:
- – Incorrect Alignment: If sensors are not correctly aligned or positioned, they may not function properly.
- – Poor Wiring Installation: Improperly routed or secured wiring can lead to electrical issues.
7. Control Unit Failure:
- – Defective Control Unit: The control unit that processes signals from the sensors can fail, causing the entire system to malfunction.
- – Power Supply Issues: Inconsistent or insufficient power supply to the control unit can affect sensor performance.
Understanding the common causes of parking sensor failure can help in diagnosing issues promptly and taking appropriate actions to maintain their functionality.
Can parking sensors be replaced?
Yes, parking sensors can be replaced. If a parking sensor is found to be faulty or damaged, it can be replaced with a new one. The replacement process typically involves the following steps:
- 1. Diagnosis: Use a diagnostic tool to identify which sensor is malfunctioning.
- 2. Access the Sensor: Remove any necessary components, such as the bumper, to access the faulty sensor.
- 3. Disconnect the Sensor: Unplug the electrical connector from the faulty sensor.
- 4. Remove the Sensor: Detach the sensor from its mounting.
- 5. Install the New Sensor: Fit the new sensor into the mounting and secure it.
- 6. Reconnect the Sensor: Plug the electrical connector into the new sensor.
- 7. Test the Sensor: Reassemble any removed components and test the new sensor to ensure it works correctly.
It’s important to use the correct type and model of sensor that is compatible with the vehicle. If you’re not comfortable performing the replacement yourself, it’s advisable to have a professional technician handle the task to ensure it’s done correctly.
Can you install your own parking sensors?
Yes, you can install your own parking sensors if you have the necessary tools and basic knowledge of automotive electrical systems. Here’s a general guide on how to do it:
Tools and Materials Needed:
- – Parking sensor kit
- – Drill and appropriate drill bits
- – Screwdrivers
- – Wire cutters/strippers
- – Electrical tape
- – Multimeter (optional, for testing connections)
- – Vehicle-specific wiring diagram (recommended)
Installation Steps:
1. Choose the Sensor Locations:
Decide where you want to install the sensors on your bumper. Most kits come with recommendations for optimal placement.
2. Mark the Positions:
Use the template provided in the kit or measure and mark the positions on the bumper where the sensors will be installed.
3. Drill Holes:
Carefully drill holes in the marked positions. Make sure the drill bit matches the size required for the sensors.
4. Install the Sensors:
Insert the sensors into the drilled holes and secure them according to the kit instructions.
5. Run the Wiring:
Route the sensor wiring through the bumper and into the vehicle’s interior. Be careful to avoid any sharp edges or moving parts that could damage the wires.
6. Connect to the Control Unit:
Mount the control unit in a suitable location inside the vehicle, such as the trunk or under a seat. Connect the sensor wires to the control unit as per the kit’s instructions.
7. Power the System:
Connect the control unit to the vehicle’s power supply. This often involves tapping into the reverse light circuit so the sensors activate when the vehicle is in reverse.
8. Install the Display/Buzzer:
If your kit includes a display or buzzer, mount it in a visible or audible location for the driver. Connect it to the control unit.
9. Test the System:
Turn on your vehicle and shift into reverse to test the sensors. Ensure they are detecting obstacles correctly and the display/buzzer is functioning properly.
10. Secure and Finish:
Once everything is working correctly, secure all wiring with zip ties and electrical tape to prevent any loose connections. Reassemble any parts of the vehicle you had to remove.
Preventive Maintenance Tips
- – Clean sensors regularly during washing.
- – Inspect bumpers and wiring after any impact or repair work.
- – Avoid pressure-washing sensor areas directly.
- – Keep electrical connectors dry and sealed.
- – Test your battery annually low voltage often disables PARKTRONIC.
Conclusion
A non-functioning Mercedes parking sensor system is often the result of simple electrical or installation errors rather than major module failure.
In this case, methodical diagnosis starting from power verification to physical inspection restored full PARKTRONIC functionality without unnecessary part replacement.
By combining regular maintenance, correct installation practices, and professional diagnostic tools, drivers can ensure their Mercedes-Benz parking assist remains accurate and reliable.
For related real-world ADAS fault guides from Radar Sensor Dirty to Blind Spot Assist Inoperative visit our complete hub: Mercedes Driver Assistance System Faults: Radar, Blind Spot & Parktronic Fixes
— Salim, Mercedes Expert
Independent specialist in Mercedes-Benz diagnostics, CAN Bus analysis, troubleshooting case studies, and EV systems.