Table of Contents
Leaking Thermostat Housing in Mercedes-Benz CLA 200: A Step-by-Step Guide to Diagnosis and Repair
If you own a Mercedes-Benz CLA 200 equipped with the M282 engine, you may encounter a common issue: leaking thermostat housing. This problem should not be ignored, as it can lead to coolant loss, overheating, and engine performance issues. A timely repair not only prevents costly damage but also extends the life of your Mercedes cooling system.
In this guide, we’ll walk through the symptoms, diagnosis, and repair process of a leaking thermostat housing in the CLA 200, with practical steps that any qualified technician or informed owner should follow.
Symptoms of a Leaking Thermostat Housing
Detecting the signs of a leaking thermostat housing early can save you from costly repairs. Common symptoms include:
- 1. Coolant Leakage: Visible puddles of coolant beneath the car or wet residue around the thermostat housing.
- 2. Overheating Warning: Dashboard alerts indicating high engine temperature, especially during extended drives.
- 3. Inconsistent Engine Temperature: Fluctuating readings that fail to stabilize under normal operating conditions.
Diagnosis of a Mercedes CLA 200 Thermostat Housing Leak
A correct diagnosis avoids unnecessary repairs. Here’s a step-by-step approach:
1. Visual Inspection
- – Check the thermostat housing and surrounding area for coolant residue or active leaks.
- – Use a flashlight to inspect hidden areas near the housing.
2. Thermostat Functionality Test
- – Observe whether the thermostat opens and closes as the engine heats.
- – Use an infrared thermometer to measure hose temperature differences.
3. Pressure Test
- – Use a coolant pressure tester to pressurize the system.
- – Inspect seals, housing material, and gaskets for cracks or warping.
Table: Symptoms, Causes, and Fixes for Mercedes CLA 200 Thermostat Housing Issues
| Symptom | Possible Cause | Solution |
|---|---|---|
| Coolant puddles under car | Cracked thermostat housing or gasket | Replace housing + new gasket/O-ring |
| Engine overheating | Restricted coolant flow | Replace thermostat + housing |
| Temperature fluctuations | Faulty thermostat not opening properly | Install new thermostat unit |
| Coolant smell in cabin | Coolant leak onto hot components | Replace leaking housing, refill + bleed system |
How to Replace the Thermostat Housing in your car?
Replacing the thermostat housing in your car involves a series of steps that ensure the process is done safely and effectively. Here’s a detailed guide:
Step 1: Preparation
- – Park on a level surface and let the engine cool.
- – Disconnect the negative battery terminal.
- – Place a catch pan, open the radiator drain plug, and drain coolant fully.
Step 2: Access the Thermostat Housing
- – Remove the air intake duct and nearby components.
- – Label disconnected wires/hoses for easier reassembly.
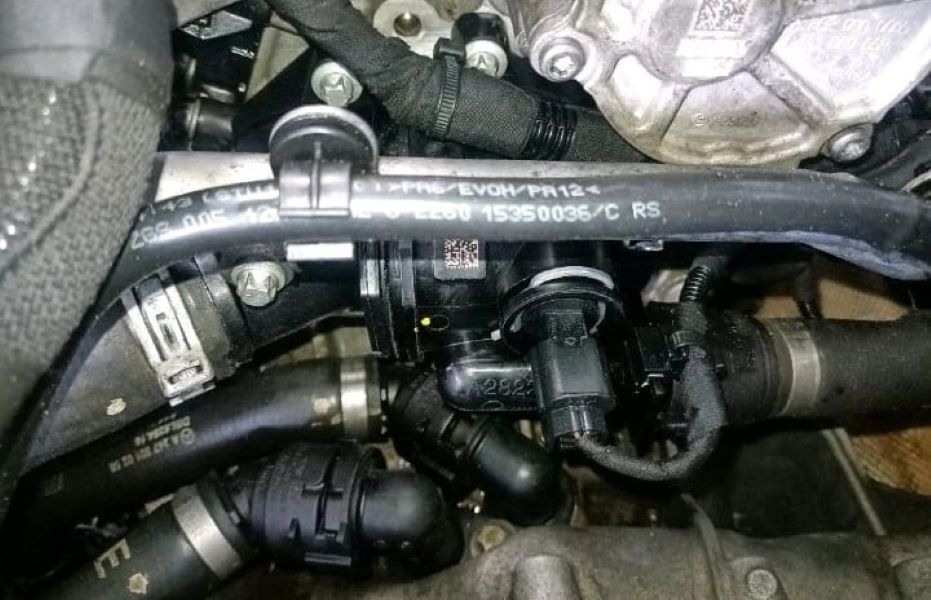
- – Locate the thermostat housing connected to the engine block and radiator.
Step 3: Remove the Old Thermostat Housing
- – Loosen hose clamps and detach coolant hoses.
- – Use a socket wrench to remove housing bolts.
- – Remove the housing with gasket/O-ring.
- – Inspect the thermostat itself; replace if necessary.


Step 4: Install the New Thermostat Housing
- – Clean the mounting surface thoroughly.
- – Fit the new housing with gasket/O-ring.
- – Hand-thread bolts, then torque to factory specifications.


Step 5: Reassemble and Refill
- – Reattach coolant hoses and clamps.
- – Reinstall air intake and any removed parts.
- – Refill with Mercedes-approved coolant at a 50/50 mix.

Step 6: Final Checks
- – Bleed the cooling system by running the engine with radiator cap off.
- – Inspect for leaks and confirm pressure stability.
- – Perform a road test and ensure engine temperature remains stable.
Why This Problem Occurs
The thermostat housing in the Mercedes M282 engine is made of composite plastic. Over time, heat cycles and vibration can cause cracking, warping, or gasket wear—leading to coolant leaks. If neglected, this can result in engine overheating, cylinder head damage, or costly repairs.
Conclusion
The leaking thermostat housing is a frequent issue in the Mercedes-Benz CLA 200 (M282 engine). By recognizing the symptoms early, performing the right diagnostics, and following a structured repair process, you can resolve the issue effectively.
Timely repairs not only prevent overheating but also extend the life of your cooling system. Always use genuine Mercedes parts and proper coolant to ensure long-lasting performance.
More Mercedes Cooling System Resources
Want to explore more causes, symptoms, and repair tips for coolant leaks, overheating, and contamination?
Learn more about Mercedes cooling system faults in our full Cooling System Guide.
FAQs About Mercedes CLA 200 Thermostat Housing Leak
Q1: Can I drive my Mercedes CLA 200 with a thermostat housing leak?
It is not recommended. Driving with a coolant leak risks overheating and severe engine damage.
Q2: How much does it cost to replace a thermostat housing in a Mercedes CLA 200?
Costs vary by region, but typically range between $350–$700 including parts and labor.
Q3: How long does thermostat housing replacement take?
A professional mechanic can complete the repair in 2–3 hours, depending on accessibility.
Q4: Should I replace the thermostat when changing the housing?
Yes, it’s best practice to replace both together, as many housings come with an integrated thermostat.
Author
Written by: Mercedes Expert
Automotive Technical Trainer & Mercedes-Benz Diagnostic Specialist
With years of hands-on experience repairing and diagnosing Mercedes-Benz vehicles, specializes in case-study-based troubleshooting guides that blend workshop accuracy with educational clarity.
— Salim, Mercedes Expert
Independent specialist in Mercedes-Benz diagnostics, CAN Bus analysis, troubleshooting case studies, and EV systems.


Leave a Reply